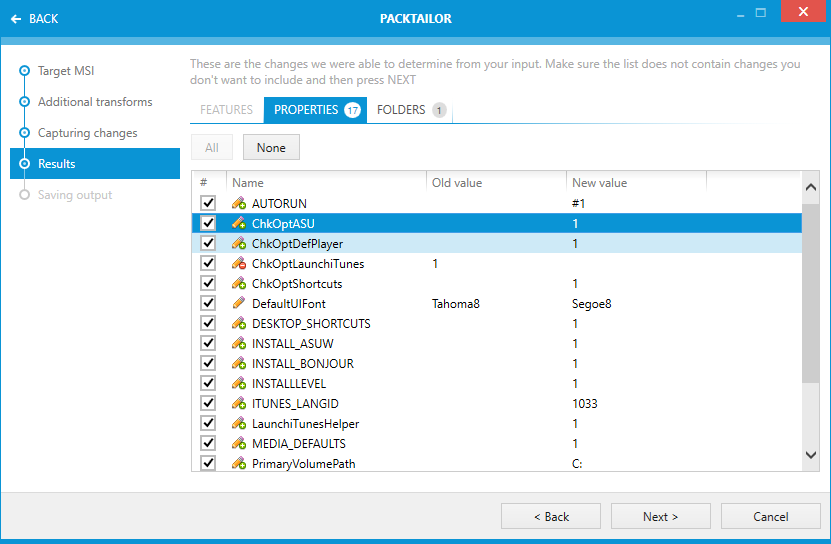
This page displays the changes that have been recorded by the PackTailor process. The user can select which changes are to be saved in the resulting transform file. The changes recorded are divided into three categories, FEATURES, PROPERTIES, and FOLDERS.
A number displayed next to each entry informs how many modifications are currently active.
Features
This tab shows the features whose installation will be modified according to the settings made during the tailoring. The Old state column shows the original state of the feature and the New state column shows the state that was recorded. Features with New state Not Install are not to be installed (the 'Level' column of the Feature, in the Feature table will be set to '0'). Features with New state Install are about to be installed.
When an item in the view is selected, right-clicking it displays the context menu as shown below. This allows the user to quickly select / de-select all of the entries.

The changes to the PROPERTIES and / or changes to FOLDERS may be reviewed. Alternatively one can choose the Next > button to continue. Choosing < Back will return to the previous page, and choosing Cancel will return to the Home Screen.
Properties
From the screenshot above, the user can see that the property AUTORUN was not initially set in the vendor installation. During the installation it was assigned the value of another property, in this case #1.
When an item in the view is selected, right-clicking it displays the context menu as shown above. This allows the user to quickly select / deselect all of the entries.

The changes to the FEATURES and / or changes to FOLDERS may be reviewed. Alternatively on can choose the Next > button to continue. Choosing < Back will return to the previous page, and choosing Cancel will return to the Home Screen.
Folders

Click the items to navigate to the various sections of the PackTailor process
From the screen shot above, one can see that various directories have been set and or dynamically created. Those entries that remain selected will be added to the Directory table of the resulting transform where possible. If this is not possible, then SetProperty (Type 51) custom actions will be used.
|
Tip: Depending on the internal structure and use of CustomActions inside the tailored package, the section FOLDERS may show some changes that were not triggered by the direct manipulation via user interface. Various actions running in the background may change the folder paths as well. |
When an item in the view is selected, right-clicking it displays the context menu as shown above. This allows the user to quickly select / de-select all of the entries.
|
Tip: By default, folders resolving to user locations (for example [AppDataFolder] and its children) are unchecked. If it is certain that the captured change is relevant and is a critical piece of your installation, then make sure to tick the appropriate checkbox before continuing. |
The changes to the FEATURES and / or changes to PROPERTIES can be viewed to see if they are satisfactory or the user can choose the Next > button to continue. Choosing < Back will return to the previous page, and choosing Cancel will return to the Home Screen.
|
Note: Only certain folder changes are scanned by PackTailor. INSTALLDIR and target directories of MSI features are examples of properties that are included in the scan. |
