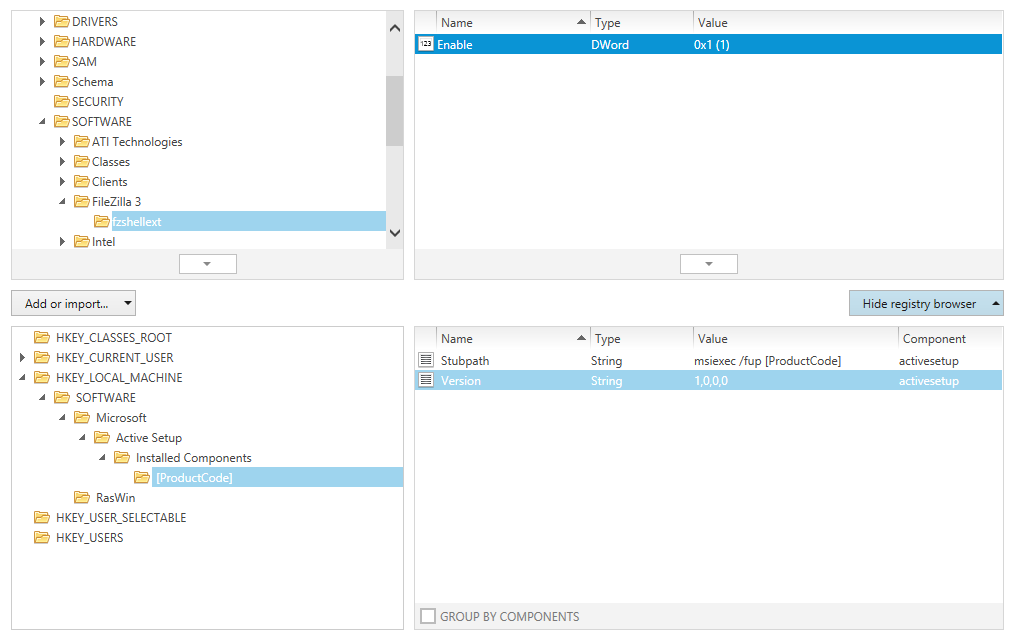
The Registry view is designed to manage the transfer of registry keys and values from the package resources to the target machine during run-time. In order to provide a user interface that does both, i.e. make it easy to put those objects into the package and at the same time offer an elaborate set of manipulation options; make sure that they arrive and behave exactly as expected on the target machine.
The Package Registry Browser
Within the Visual Designer view Registry, the main interface component is the package registry browser, which consists of two windows. On the left it contains a tree structure of hives and keys that are already available within the packaging project. Once one of those keys is selected, the details window on the right hand side presents the values which are stored within the key.
The following sections provide an overview of the most important interface features designed to improve the user experience and efficiency of the package registry browser:
Group by Components
The values within one key of a projects registry content structure may be wrapped in one common component, but usually they are not. In order to quickly determine what value belongs to which component, the GROUP BY COMPONENTS checkbox can be used. If it is activated, the value list is grouped by components. The arrow left of the component group header expands and collapses the list of values for that specific component to even improve the clarity of the grouped list.
Bulk Operations on Registry Contents
Since the amount of required registry objects within packaging projects may grow to an enormous extend, RayPack offers to import or export registry contents. These bulk operations support the handling of larger registry contents and significantly save time spent on standard packaging project tasks.
Sort by Property
The list of values stored within a specific key is displayed in a table with the columns Name, Type, Value and Component. Use the column headers to sort the list by one of these criteria (ascending or descending).
Go to Row
Each object that is displayed within the left registry tree structure or right value inspector window of the package registry browser is a representation of one specific row of the Registry table of the Installer database. With a right-click on the object and the selection of the Go to Row option from the context menu, RayPack switches to the TABLES view of the Advanced mode and focuses the related table row for the key or value object.
Browse the Registry Tree by Keyboard
Besides simply expanding and collapsing sub-tree structures with a mouse-click on the arrow icons left of a registry key name, users can also navigate by using their keyboard:
•To move vertically to the next adjacent registry tree node, use the Up and Down arrow keys
•To expand a node, use the Right arrow key
•To collapse a node, use the Left arrow key
Further keyboard shortcuts are available as well:
•Hit Insert to add a new key to the currently selected one
•Hit Delete to remove the currently selected key
•Hit F2 to rename the currently selected key
•Hit Alt+Enter to open the properties editor dialog for the selected key
The System Registry Browser
The first phase of working on registry contents is to import external resources into the packaging project. During this initial phase, users will often work with the system registry browser. This is another set of two adjoining windows for a registry key tree on the left and a value listing on the right. Whilst the package registry browser contains registry objecs present within the packaging project, the system registry browser is an exact representation of the registry contents on the packaging machine that runs RayPack.
See Add registry keys and values for details.
Key and Value Object Manipulation
Once registry objects are available within the project, they need to be enriched with specific settings in order to control their behavior at Installer run time and during their presence on the target device. This includes settings regarding permissions, feature and component relations, types, and the like.
See Edit registry key properties and Edit registry value properties for details.
Registry keys and values are represented by items within the Installer database table Registry. Switch to the TABLES view of the Advanced mode to access the Registry table directly.
Unset a Key Path
It is possible to remove key path components by opening the context menu and selecting the Unset a key path option.
