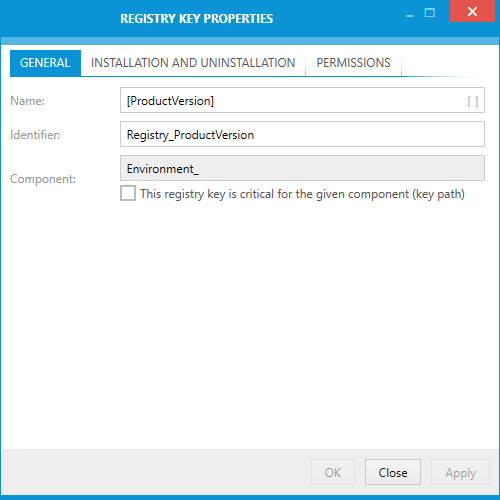
Once a key has been created below one of the standard registry hives of a packaging project, its properties can be adjusted.
To do so, users should
•right-click the key within the left window of the package registry browser.
oTo edit the key properties within the Visual Designer interface, users select the Properties option from the context menu.
oTo edit the key properties directly within the resembling row of the Registry table of the TABLES view of the Advanced mode, users select Go to row from the context menu.
•left-click the key within the left window of the package registry browser and use the key combination Alt + Enter.
The REGISTRY KEY PROPERTIES dialog is displayed and reveals three tabs of property groups for manipulation:
•INSTALLATION AND UNINSTALLATION
As soon as all required changes are executed, users can either use the Apply button to save the changes to the registry key object and keep the REGISTRY KEY PROPERTIES dialog open, or use the OK button to save and close the dialog.
Clicking on the Cancel button closes the dialog is closed without applying unsaved changes.
The GENERAL Tab
Name
This is the name of the key as it appears on the target machine. It has to be unique among the keys within the same hive or parent key. A key name may not be empty or have a backslash (\) at its start or end. See MSDN for details regarding limitations for values of RegPath columns.
Identifier
The identifier is the unique internal pointer to the key. The Identifier data type is a text string. Identifiers may contain the ASCII characters A-Z (a-z), digits, underscores (_), or periods (.). However, every identifier must begin with either a letter or an underscore.
Component
A key always has to be related to a specific component. As soon as the first key is added to one of the standard registry hives, RayPack creates a component for that hive and automatically adds any key to the component of its parent hive:
•Keys within HKEY_CLASSES_ROOT are added to component Registry_HKCR
•Keys within HKEY_CURRENT_USER are added to component Registry_HKCU
•Keys within HKEY_LOCAL_MACHINE are added to component Registry_HKLM
•Keys within HKEY_USER_SELECTABLE are added to component Registry_HKMU
•Keys within HKEY_USERS are added to component Registry_HKU
|
Note: The component property cannot be modified via the interface provided within the Visual Designer mode. However, manipulation is always possible by manually changing the content stored within the Registry table of the Installer database. Please refer to the topic about the Advanced Mode TABLES view for further details. |
Key Path
If a registry key is marked to be the key path of a component, the existence of the key path determines the health state of that component. If the registry key does not exist on the target machine, the Installer's Repair functionality assumes that the component needs to be repaired.
The INSTALLATION AND UNINSTALLATION Tab
RayPack offers four standard behaviors for registry key handling during installation and uninstallation routines. The name column within the Registry table of the key is used to store the behavior information. Each of the non-standard options below is symbolized with a specific first letter for that column:
•Automatic
This is the default option which is set for new registry keys. Use it if no special handling is required.
•Install only (+)
This key is not used during uninstallation, and is only created during installation, if not already present on the target machine.
•Uninstall entire key (-)
Using this option causes the uninstallation sequence to delete the key even if it is not empty. During installation, the key is not used.
•Install if absent, uninstall if empty (*)
This option handles the key during installation as if a + would have been set, but additionally removes it from the target machine during uninstallation if it is empty. If any sub-keys or values are still residing inside the key when the uninstallation is triggered, the key itself is not handled due to its own behavior settings.
|
Note: The installer removes a registry key after removing the last value or sub-key under the key. To prevent an empty registry key from being removed when uninstalling, write a dummy value under the key needed to be kept and enter + in the Name column. If * is in the Name column, the key is deleted with all of its values and sub-keys, when the component is removed. |
