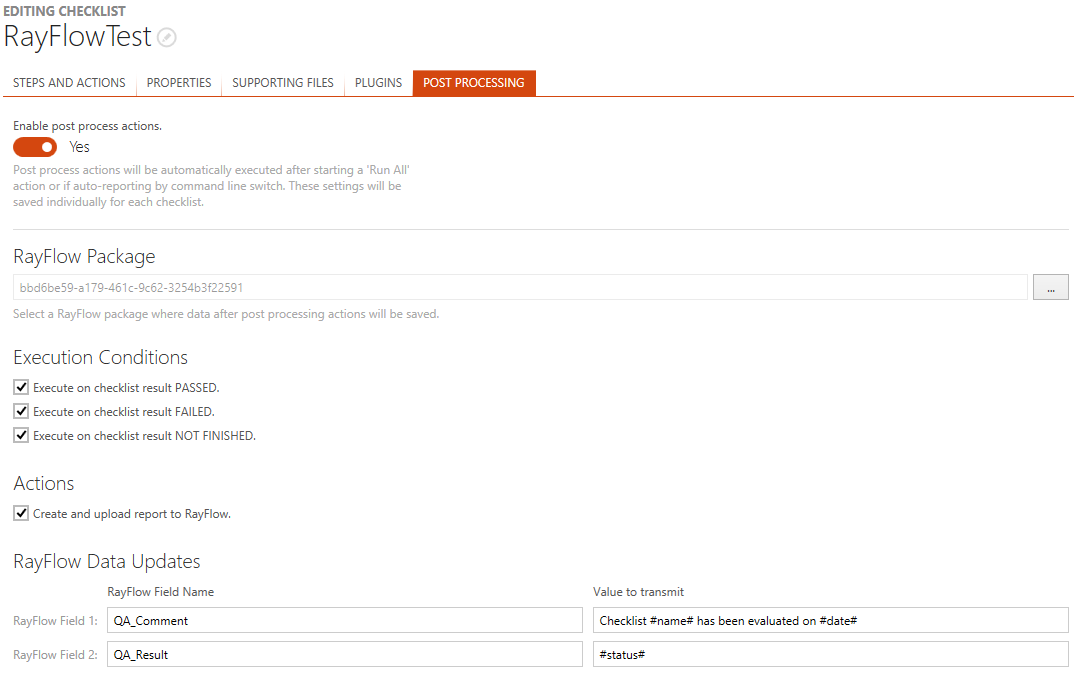
What is Post Processing?
It is quite likely that RayQC is used as a tool that is integrated into RayFlow. This means that evaluations are commonly triggered from a RayFlow server. In order to provide bidirectional communication, there is not only a way to get data from RayFlow into RayQC, but also to return information (report files and updated values for RayFlow data fields) back to the RayFlow server. In order to standardize and automate this conversation as far as possible, users may define certain post processing tasks. If post processing itself is activated for a checklist, RayQC checks for condition fulfillment, and executes the post processing actions if one of the active conditions is meet.
Post processing may either be triggered manually by using the post processing button from the Swipe bar of the Checklist Viewer, or automatically as extension of a Run All procedure execution. The latter option is the required one for fully automated checklist evaluations. RayFlow triggers the checklist run including the automation parameter, and RayQC automatically responds with the information defined within the post processing section.
However, it is also handy for users to be able to upload checklist evaluation results to RayFlow themselves, since not all checklists may be fully automated. This is where the button for post processing execution kicks in.
|
Be aware: Post processing can only operate successfully, if the current evaluation session has a valid RayFlow connection. If no parameter injection is given and the user has not manually authenticated to RayFlow, there is no valid target for the data RayQC has to send. The result is an error message, which will be displayed if post processing fails due to missing connectivity. |
To Enable or Disable Post Processing Options for a Checklist
The default state of the post processing options, which is given for example when a user calls the POST PROCESSING tab for a specific checklist for the first time, is disabled.

To enable post processing, users have to activate the Enable post process actions. Further adjustments are required to fine-tune what has to be executed and under which circumstances RayQC executes it. Setting Enable post process actions to No does not delete the settings defined so far, but simply deactivates the execution of the defined actions and hides the post processing option controls. It does not matter how often a user enables and disables the post processing, the latest settings are preserved and become editable with every post processing enabling.

Post Processing Options
If post processing is enabled, users may decide about the following settings:
RayFlow Package
Stores an ID of a RayFlow package to which data from post processing actions will be saved. After clicking on the browse button [...] users will be able to select a package using the common RayFlow pop-up window.
Execution Conditions
As outlined above, there are several triggers that may cause RayQC to initiate post processing. The first step of post processing is to check whether the conditions for further activity execution are meet:
•Execute on checklist result PASSED
If a checklist evaluation has led to the overall result PASSED, this condition is fulfilled (=evaluates to true).
•Execute on checklist result NOT PASSED
If a checklist evaluation has led to the overall result FAILED, this condition is fulfilled (=evaluates to true).
•Execute on checklist result NOT FINISHED
If a checklist evaluation has not led to a PASSED or FAILED overall status, this condition is fulfilled (=evaluates to true).
If 1 of the enabled conditions is fulfilled, actions and data field updates are actually executed according to the settings described below:
Actions
Activate the Create and upload report to RayFlow checkbox to automatically generate a report and export the resulting file to RayFlow. Since the report generation is not triggered manually, RayQC applies the settings defined within the currently active report profile for the report generation.
If the checklist evaluation has been triggered by RayFlow, and an explicit report profile has been forced by parameter, RayQC applies the rules defined for that specific report profile.
RayFlow Data Updates
Besides simply sending a report file to the RayFlow database, it is also possible to update dedicated fields of the package order object that is connected to the current checklist run.
|
Note: Please remember that RayFlow connections may be defined either by the currently active RayFlow connection profile, or by injection via command line parameters used to initiate the active RayQC session. |
The post processing configuration interface allows defining a set of RayFlow fields that will be updated with specific values. To demand a field update, users have to fill in the field name into the left column (RayFlow Field Name) of the RayFlow Data Updates control elements matrix, and the value that has to be set into the corresponding Value to transmit field.
Possible values for data field updates are:
•Predefined RayQC checklist object variables:
o#title# is replaced by the checklist title
o#date# is replaced by the current date (YYYY-MM-DD)
o#status# is replaced by the checklist result (PASSED, FAILED, or NOT FINISHED)
o#bypass# is replaced by the bypass status of the checklist result (regular or bypassed)
•Free text entered by the checklist designer.
•A mixture of both, free text and predefined variables