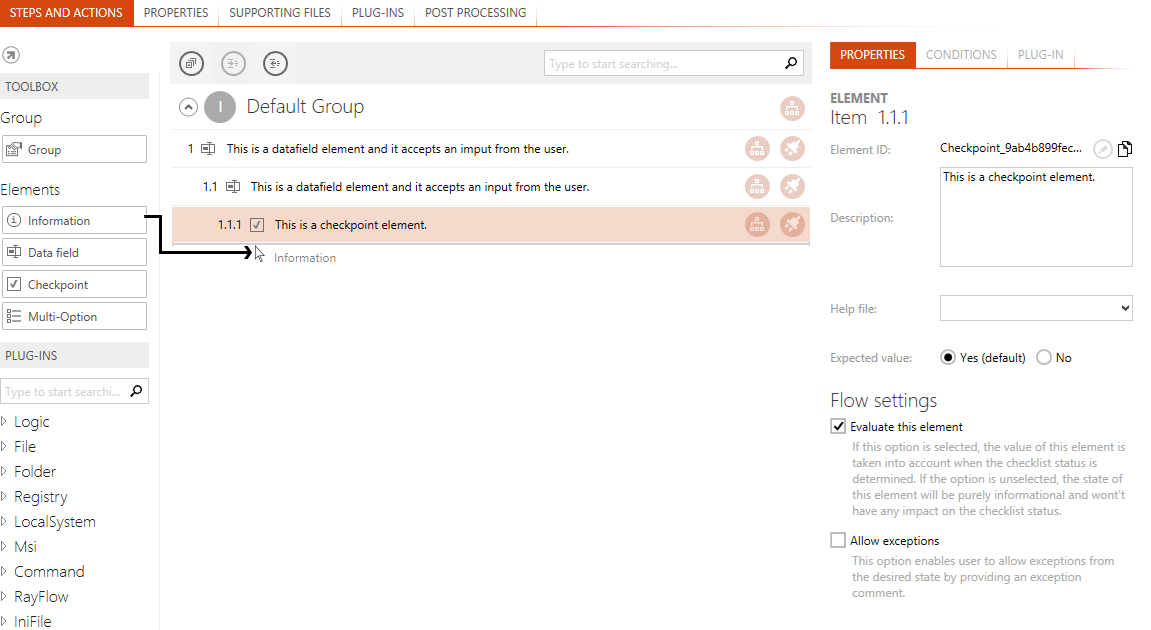
Once a checklist is opened within RayQC and the Checklist Editor mode is active, it is possible to add new elements to any of the existing groups of the checklist.
To Add an Element
1.Scroll the checklist area to display the desired target position of the new checklist item.
2.If the target group is collapsed, expand it to reveal the items already bundled inside of it.
3.Move the mouse pointer to the Toolbar area on the right and click on the item type that should be added.
4.Keep the left mouse key pressed and drag the item to the group container area at the left. An indicator bar is shown, pointing to the expected position of the new item. If no indicator bar is shown, the current mouse pointer position is not a valid target area.
5.As soon as the desired position is marked, drop the item by releasing the left mouse key. The group content is updated with the new item. The index values of all later items within the group are updated to match the new group content collection.
If the new element has been dropped at the first position within a group, it is automatically added on the highest nesting level, indicated by the index value of 1 set for the new item.
If the new element has been dropped below an existing item, it is by default added as the next item in the checklist. For example, if the element above the new one has an index value of 1, the new element becomes the next element with index value 2.
In case the element is dropped on a child element then the element becomes the child element of the parent element. E.g. If the parent element has an index value of 1 and it has a child element with index value 1.1, then when an element is dropped on 1.1, it will get the next index value that is 1.2.
The maximum depth of a checklist element hierarchy is 4, therefore it is not possible to drop elements to a deeper level than the fourth.

The screenshot above shows the drag path (dark gray line) of a new information item. If the user drops the new item right now, it is added below the item number 1.1.1, and 1.1.2 will be the designated item number.
In order to adjust the horizontal position of an element, the controls left and right have to be used. Furthermore, a user can change the vertical position of an element by dragging and dropping the element as described previously.
As soon as an element has been added to the group, its basic properties and type specific controls are available for manipulation.
|
Note: Please make sure to save the changes made to the checklist structure to keep them permanently. If the changes are not saved, closing the checklist file leads to the loss of all new settings! |