These settings affect how the PackRecorder is executed. These settings are also used by PackBot.
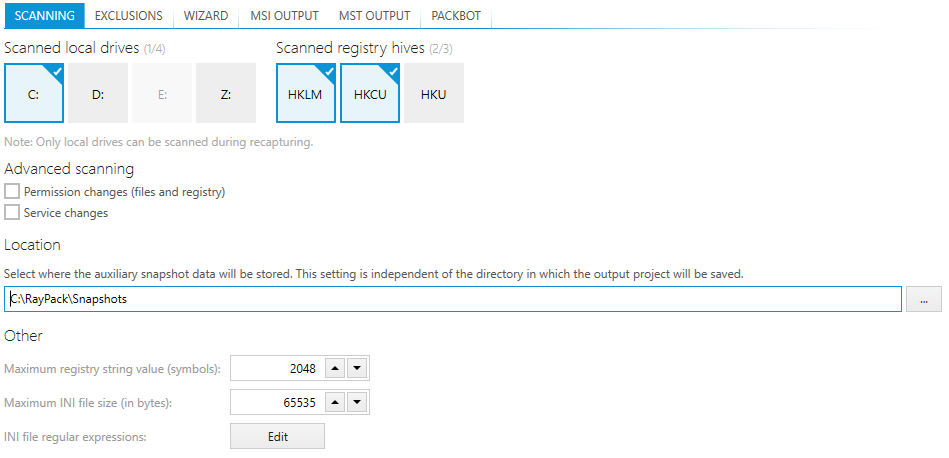
SCANNING
Scanned local drives
This section sets the local drives that are to be monitored for changes during the capture process. When initially started, all drives that are set as local drives on the machine will be present and selected (this includes any mapped drives). Select / deselect the desired drives to be monitored during the capture process.
Scanned registry hives
This section sets the registry hives that are to be monitored for changes during the capture process. Select or deselect the desired registry hives to be monitored during the capture process.
Advanced scanning
This section enables the selection of advanced options that can be used during the capture process.
•Permissions changes (files and registry)
When this option is set, changes to permissions are monitored during the capture process, both for the file system, as well as, for the registry.
|
Note: Selection of this option will significantly increase the time that it takes to finish for the scanning and the capture process. |
•Service changes
When this option is set, changes to any existing services are monitored during the capture process. Normally only the creation of new services is monitored during the capture process. Selecting this option allows the monitoring of changes to existing services during the scanning and capture process.
Location
This is the location where any temporary data and the snapshot data will be stored during the capture process.
Other
This section deals with the general options available for the capture process that are relevant for the snapshot. These include:
•Maximum registry string value (symbols)
The maximal size of a registry string to be kept as a string value, instead of being stored as a binary blob. Storing and retrieving large strings in the snapshot data is a time consuming process. Storing and retrieving binary data, however, is relatively fast, with the disadvantage that binary data is usually not human-readable, i.e. it is not possible to visually check the data. Setting this value allows the fine tuning of the size of any strings from the registry that are monitored during the capture process and saved as a string. It is recommended not to change the default value.
•Maximum INI file size (in bytes)
INI files are files that usually contain data used for the configuration of an application. In typical scenarios, these contain information that is usually specific to a particular environment or runtime. The MSI technology allows for .ini files to be installed in such a way that any values can be configured dynamically during the installation. Whilst this is an advantage over having to work with hardcoded values and eventually having to introduce customizations to change these values, it also has a disadvantage with large .ini files in that it dramatically increases the installation time required.
•INI file regular expressions
Choosing this button allows the selection of files that are to be considered as .ini files and to prefilter content of any files that are considered to be .ini files. Choosing this button will open the INI Editor. The INI Editor is described in its own section.
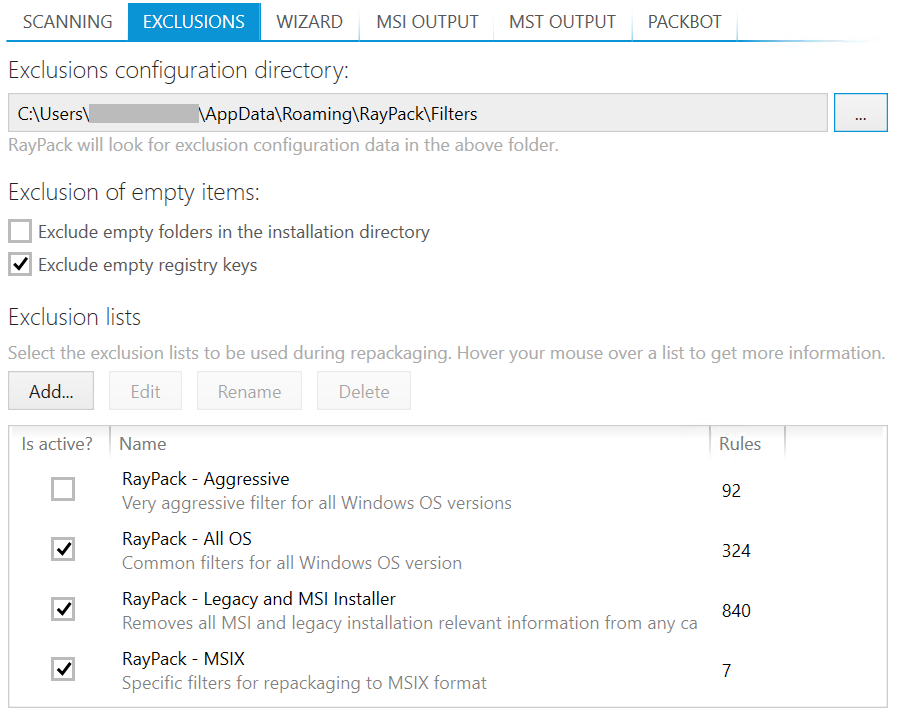
EXCLUSIONS

Click the items to navigate to the various sections of profile configuration
Capturing Empty Folders
Prior to RayPack 6.3, empty folders were not captured and had to be included manually. From version 6.3, the user can control whether the legacy behavior (ignoring empty folders) or respecting empty folders should be used when building RCP files.
|
Note: This setting applies to folders that are within the installation directory (so that temporary and system directories are always excluded if they are empty). |
Capturing Empty Registry Keys
The Exclude empty registry keys checkbox can be used to define if empty registry keys should be included or excluded when repackaging.
Exclusion Lists
The currently available exclusion lists (exclusion lists present in the Exclusions configuration directory) are listed in the left hand view. Selecting an existing exclusion list allows the user to EDIT, RENAME,or DELETE it. Selecting DELETE will permanently remove the list from the directory!
ADD
This allows an exclusion list to be added to the currently selected directory. When selecting the ADD button a valid name for the list must be entered, which will then be added to the Available exclusions view.
|
Note: The Exclusion list will be empty and must be edited by selecting the list and choosing the EDIT button! |
EDIT
Once a list has been chosen to be edited from the available exclusions view, select the EDIT button opens the exclusions editor windows. For more detailed information on editing an exclusion list, please read this section.
RENAME
Selecting an exclusion list and choosing this button, allows for the renaming of an existing exclusion list.
|
Note: The name of the file will not be changed. Only the name of the exclusion list by which it is represented. |
DELETE
Selecting an exclusion list and choosing this button, allows for the deletion of an existing exclusion list.
|
Warning: The files will be deleted permanently! |
Active Exclusions
This list shows the currently active exclusions. Multiple exclusion lists can be active at any one time. For example, the user could create a generic exclusion list for all typical exclusions, multiple exclusion lists for virtual packages, one for creating App-V packages, and another for creating ThinApp packages. The generic exclusion list would always be active, at all times, and the exclusion list for virtual packages could be applied when and where needed. To remove an exclusion list from the active configuration, select the exclusion list and click the checkbox so that it is no longer selected. Parallel to that, to select an exclusion list to be active, select the exclusion list, and ensure that the checkbox is activated.
|
Note: The exclusion list is not deleted. It will only be removed from the active configuration. |
|
Note: The installation of the RayPack includes three default exclusion lists which can be applied individually, all together, or in combination with one another. |
The default exclusion lists delivered with RayPack are:
•RayPack - All OS is a generic exclusion list which should fit most environments.
•RayPack - Legacy and MSI Installer is a list that explicitly excludes legacy installation information (Wise, InnoSetup, InstallShield), as well as MSI installer information (logs, cache, Darwin Descriptors etc.).
•RayPack - Aggressive is an exclusion list that should be examined before being used, because as the name suggests, it is radical in what it excludes from the capture process. This list may not always be suitable for an environment.
WIZARD
This is where the settings for the Capture Wizard are defined.
Capture Mode
The capture mode defines the level of detail settings required to be entered during the capture process and the visibility of options which can be changed during the capture process.
Expert Mode
The Expert mode allows all options to be changed / modified during the capture process. This capture method is recommended for power users. The Expert mode is described in more detail here.
Basic Mode
The Basic mode only allows for the minimal required options to be changed or modified. Default values and settings are used for the majority of options. This capture method is recommended for quick repackaging or for users who are not familiar with packaging technology. The Basic mode is described in more detail here.
|
Tip: When RayPack is installed, the Basic mode is used as the default setting for the PackRecorder wizard. Click on the red Expert mode icon to activate the more flexible wizard configuration. |
MSI OUTPUT
For more detailed information regarding the MSI file format and its functionality, please refer to the MSDN MSI online help.
Selecting the various options on this dialog (File options, Advertising, etc.) exposes settings for the individual items.
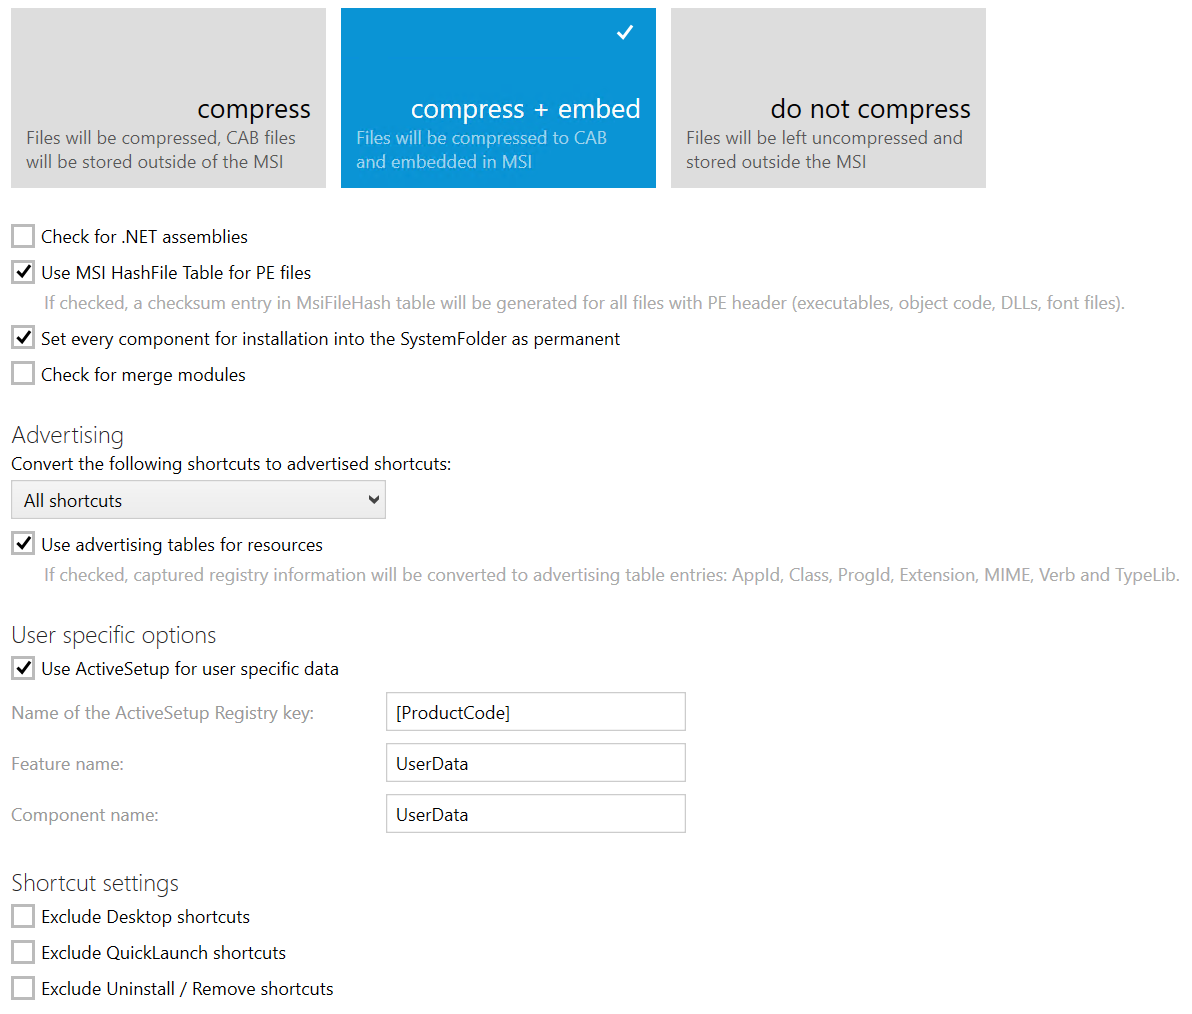
File Options
File compression
These options define how files are stored in the MSI when the package is created. There are three options available.
•Uncompressed
The files are located externally in a Pseudo directory structure in the same directory as the MSI file.
|
Be aware: The files and any directories need to be distributed together with the MSI file. |
•CAB
The files are compressed within CAB files, which are located in the same directory as the MSI file.
|
Be aware: The CAB files must be distributed together with the MSI file. |
•MSI
The files are compressed and are stored in the file stream within the MSI file.
Check for .NET assemblies
If this option is activated, all .NET assemblies that have been captured during the PackRecorder wizard run will be organized within the MSI database tables MsiAssembly and MsiAssemblyName. If the option is inactive, .NET assemblies are handled in the same way as any plain file resource.
Use MSI HashFile Table for PE files
This option defines that any PE files that are to be included in the MSI package are to have entries in the HashFile Table. If this option is selected, then a Hash value is calculated based on the PE file, and this information is stored in the corresponding table of the MSI. This ensures that any file that has been corrupted or manipulated will not have the same Hash value of said file in the HashFile table and will prevent the installation of the MSI package. This is a security measure intended to prevent manipulation of MSI packages. It is recommended that this option is enabled.
Set Every Component for Installation into the SystemFolder as Permanent
This option defines if the installer will not remove components in the SystemFolder during an uninstall. If activated, the installer will register an additional system client in the Windows Installer registry setting.
Check for Merge Modules
This option enables the checking for Merge Modules during building.
Advertising
Convert the following shortcuts to advertised shortcuts
This option permits advertised shortcuts to be created and for what type of target file (of the shortcut)
•All shortcuts
All shortcuts that are monitored and captured during the capture process will be authored as Advertised Shortcuts in the resulting MSI package.
•Shortcuts to executable files
Only shortcuts to target resources that are executables will be authored as Advertised Shortcuts in the resulting MSI package. Any other shortcuts will be created as standard shortcuts.
•None (use only non-advertised shortcuts)
No shortcuts will be authored as Advertised Shortcuts. Shortcuts included in the MSI package will be authored as standard shortcuts.
For packages that are deployed in a corporate environment, it is recommended to select the option All shortcuts.
Use advertising tables for resources
Selecting this option allows RayPack to examine the captured package or the existing MSI project and where possible, add information to the advertising tables to create advertising information. If this option is not selected, then the resources that would normally be placed into the corresponding MSI tables are authored into the MSI package as raw information, usually in the Registry table. It is recommended that this option is enabled.
In the following a a brief overview about advertising and shortcuts can be found.
•Shortcuts
The Windows Installer introduces a special type of shortcut that, while transparent to the user, contains additional meta data that the Windows Installer uses through its shell integration to verify the state of installation of the specified application prior to launching the application.
•File Associations
The Windows Installer provides a mechanism for intercepting calls for an application associated with a document or so that when a user opens a document or file using the shell, the Windows Installer can verify the application before launching the associated application.
•COM Advertising
The Windows Installer provides a mechanism that is hooked into the COM subsystem, so that any application that creates an instance of a COM component installed by Windows Installer (and configured to use this feature) will receive an instance of that component after the Windows Installer has verified the state of of installation for that component.
Using advertising, the MSI package can create so called entry points during the installation process. When utilized, these entry points let the Windows Installer know that an application (or part of an application) is to be used. The Windows Installer can then check if all of the required resources that this application needs are present on the system before the application is actually launched. If, for any reason, resources are not present, these can be (re)installed (self-repair). Afterwards the application is launched as normal. It is recommended to add / author as many entry points (advertising information) as possible into an MSI package, as this ensures that even if (for any reason) resources have been removed or are not present after the self repair, the application will function as required.
User Specific Options
These options define how user specific data is handled when creating an MSI package. Normally an MSI package is installed on a per machine base or by using a software deployment mechanism (RayManageSoft, RayManageSoft UEM, Intune, SCCM, etc.) that is executed in a userless context. Therefore, resources that are to be installed in user specific locations (HKCU, My Documents, etc.) need to be handled differently. These options allow the control of how user specific resources are deployed on the target machine.
Use ActiveSetup for user specific data
If this option is selected, a component that contains the required information to implement an Active Setup is created. This component automatically installs any user specific resources using the MSI self-repair mechanism.
|
Tip: For a more detailed explanation of the Active Setup, please read this section. |
Name of the ActiveSetup Registry key
This is the name of a subkey that is to be created in the Active Setup Registry. By default, it is configured to be [PackageCode], but it can be overwritten to match a companies defaults, for example Company_[PackageCode].
Feature name
This is the name given to the feature that will be created in the MSI package when user specific resources are compiled into the MSI package. This feature will contain user specific components (see below). Entering a name that is easily identifiable ensures that when editing the package, the user can see at a glance which resources are machine specific and which resources are user specific.
Component name
This is the name given to the component that contains user specific resources. This component is automatically assigned to the user specific feature (see above). Entering a name that is easily identifiable ensures that when editing the package, users can see at a glance which resources are machine specific and which resources are user specific.
|
Tip: For a more detailed explanation of the MSI technology, including Features and Components, please refer to the MSDN online help. |
Shortcut Settings
These options define how advertising information and shortcuts are handled during the creation of the MSI package.
Exclude Desktop shortcuts
Selecting this option enables RayPack to attempt to automatically remove any information regarding Desktop shortcuts from the resulting .msi package on compilation.
It is recommended to enable this option for packages that are to be deployed in a corporate environment.
Exclude QuickLaunch shortcuts
Selecting this option enables RayPack to attempt to automatically remove any information regarding QuickLaunch shortcuts from the resulting .msi package on compilation.
It is recommended to enable this option for packages that are to be deployed in a corporate environment.
Exclude Uninstall / Remove shortcuts
Selecting this option enables RayPack to attempt to automatically remove any information regarding Uninstall / Remove shortcuts from the resulting .msi package on compilation.
It is recommended to enable this option for packages that are to be deployed in a corporate environment.
|
Tip: For a more detailed explanation of the MSI technology, including advertising, entry points and self-repair, please refer to the MSDN online help. |
MST OUTPUT
For more detailed information regarding the MST file format and its functionality, please refer to the MSDN online help. These settings determine how the PackRecorder handles the capture of Windows Installer based installations. During the capture process, the PackRecorder (where possible) will automatically recognize that a Windows Installer based setup is being executed. These options define how the resulting transform file is created after the capture process has been completed.
This section deals with the options available for creating .mst files (Transform files). Transform files are used to customize existing MSI packages. This is the recommend option for making changes to existing MSI installation packages.
Transform Options
These options define how the various windows installer functionalities are applied to the transform that is created by RayPack.
Transform Features
If this option is active, changes that have been captured that are relevant to the Features are added to the resulting transforms Feature table.
Transform Properties
If this option is active, changes made to properties are added / updated in the Property table of the resulting transform file.
Add Files
If this option is active, any files that have been captured during the capture process that are not present in the original File table, are added to the resulting transforms File table.
Update Files
If this option is active, there are changes to files that are present in the original MSI, but which are now different. For example, once the installation is complete a manual change is made to the file application.exe, which had the version 1.0.0 with the same file name, but a higher version 1.2. This information is then updated in the resulting transforms File table. Please use this option with caution.
Add Registry Entries
If this option is active, changes to the registry that are not present in the original Registry table are added to the Registry table of the resulting transform.
Update Registry Entries
If this option is active, changes to registry values that are present in the original Registry table are updated in the Registry table of the resulting transform.
|
WARNING Use this option with caution because it may lead to hardcoded values in the resulting transform! |
PACKBOT
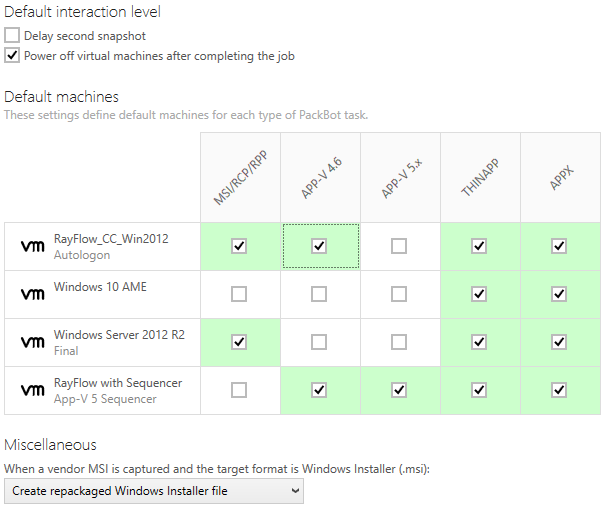
The following settings define the default values for new PackBot tasks.

Delay second snapshot
The default value for delaying the second snapshot. For more information about the meaning of this setting, refer to the Interactive Processing (Aka "Delayed Second Snapshot") section in the following chapter Basic Concepts.
Power off virtual machines after completing the job
When activate (default value), after a virtual machine is not needed anymore it is automatically powered off. Uncheck this option to leave the machine running.
|
Note: |
Default machines
This matrix visually represents the assignment of available virtual machines to particular task types. The virtual machines are shown on the left side of the table and supported formats on the top. When creating new tasks (or changing the type of existing tasks) the pool of the machine is arranged so that it matches the required package type. This is how it is possible to specify, for example, that conversion to virtual formats (which usually requires a presence of third-party runtimes / tools, for example Microsoft App-V Sequencer for App-V packages) runs only on those virtual machines which fulfill its prerequisites.
Vendor MSI settings
This setting defines the desired behavior of PackBot should a Windows Installer session be detected in the background AND the target format is MSI. Three available options are:
oCreate Windows Installer transform (.mst)
This produces an MST containing changes to the original MSI, preserving original GUIDs, components structure etc.
oCreate repackaged Windows Installer file
This simply converts the repackaged output to an MSI file and disregards the original vendor MSI
oCreate both transform and repackaged .msi file
This combines both previous options. This option is the slowest, but also the most reliable since the user can decide on his own what was actually intended by that particular conversion process. This is a default value.
More information about vendor MSI behavior and options are available in chapter Detection of Vendor MSI Setups.

