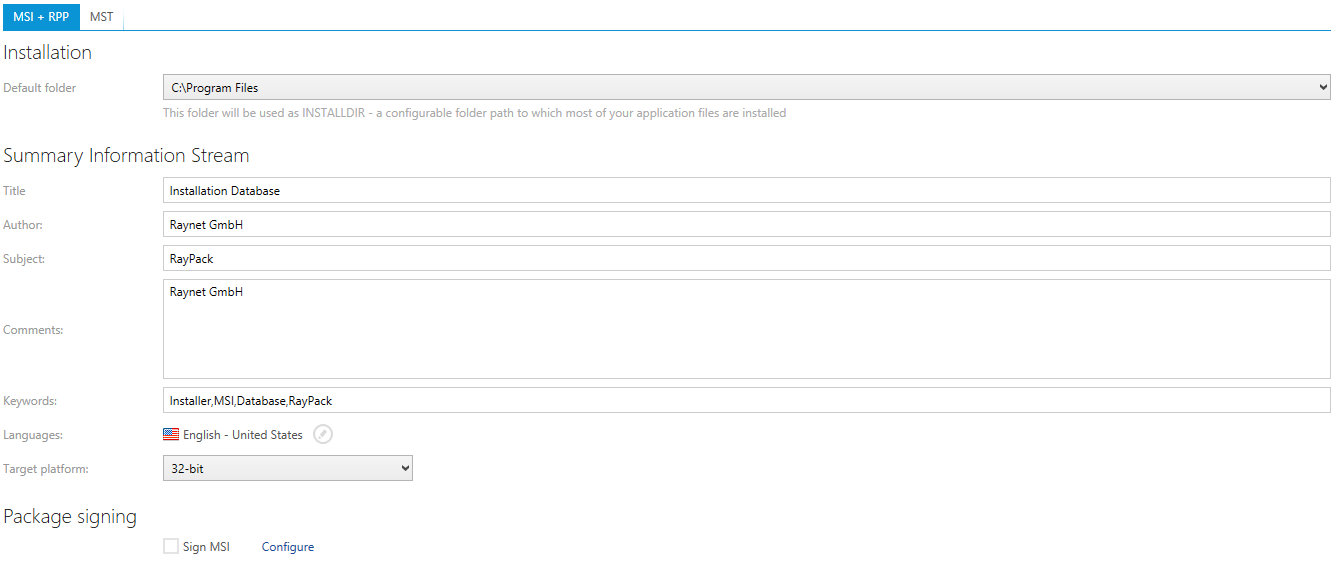
This view shows the configuration build settings for creating specific package types based on the information contained within the capture project.
|
Note: Once the build options are defined, users have to click on FILE and select Build from the options menu to trigger the actual package / project build procedure. |
MSI + RPP
This tab contains various meta-data information used when the MSI-based project (including internal *.rpp format) are generated.

The screen is divided into tabs. Each tab contains a group of settings used by the specific project exporter.
Default Folder
This is the default installation directory of the application contained within the resulting project / package. Using the drop-down box, the user may choose which directory is the default installation directory. Please note that only the directories that are present in the RCP project can be selected.
Title
A description of this file as an installation package. The description usually includes the phrase "Installation Database", but this is not a requirement.
Author
This is where the name of the manufacturer of this product goes (for example, Adobe, 7-Zip.org etc.).
Subject
This is used for the name of the product installed by this package. This is usually the same name as in the Application name value set in the general settings.
Comments
Usually contains the phrase: "This installer database contains the logic and data required to install Product name". In this example, the creation date and time is used.
Keywords
A list of keywords that may be used by file browsers to do keyword searches for a file (search service and indexing on windows operating systems). The keywords usually include "Installer", as well as, product-specific keywords. In this example, the project name has been used.
Target Platform
The information set in the Target Platform value is used in conjunction with the Languages value to create the Template Summary property. Possible values are:
•Inherited from template - The target platform is inherited from the template and not set manually.
•32-bit - The package is for 32-bit not 64-bit platforms
•64-bit running on x64 platform - The package is only for 64bit platforms (AMD64, not Intel Itanium architecture)
•64-bit running on Intel64 platform - The project is for 64bit Itanium platforms (not AMD64 platforms)
Languages
The Language value sets the languages that are compatible with the resulting MSI project. If this field is left empty, then 0 is automatically assumed (in this case the language 0 means that all languages are supported). This field can contain multiple Language ID's, each separated by a semi-colon such as 1031;1033.
Sign MSI
When an MSI file is built from the current RCP project, it is possible to sign it. To do so, activate the checkbox Sign MSI. The settings values for package signing (e. g. certificate and password) from the current profile are used to perform the signing.
|
Note: Package signing only applies to MSI target packages. If an RPP (or MST) is build, signing does not take effect. |
|
Be aware: The Sign MSI checkbox is displayed read-only if there are no signing configuration settings available. To enter or adjust the package signing settings, click on the Configure link. The required settings editor dialog is displayed in an additional window, ready for immediate interaction. As soon as the sign settings are saved and the additional application dialog is closed, the Sign MSI checkbox becomes available for activation. |
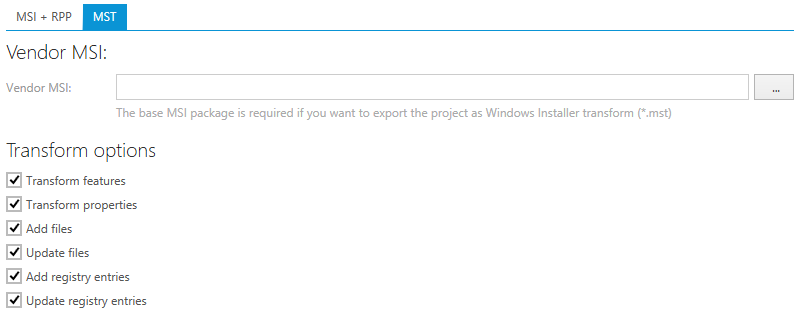
MST
This tab contains settings required for MST generation from capture projects.

MST related build options
Vendor MSI
The sources stored within the .rcp file will be compared to the base MSI defined here. The MSI is used to determine the delta for the transform generation.
Transform Options
The following list of project content control options may be used to author transform database table contents:
•Transform features
•Transform properties
•Add files
•Update files
•Add registry entries
•Update registry entries
Activate the checkboxes to include the respective content type into the created transform file.