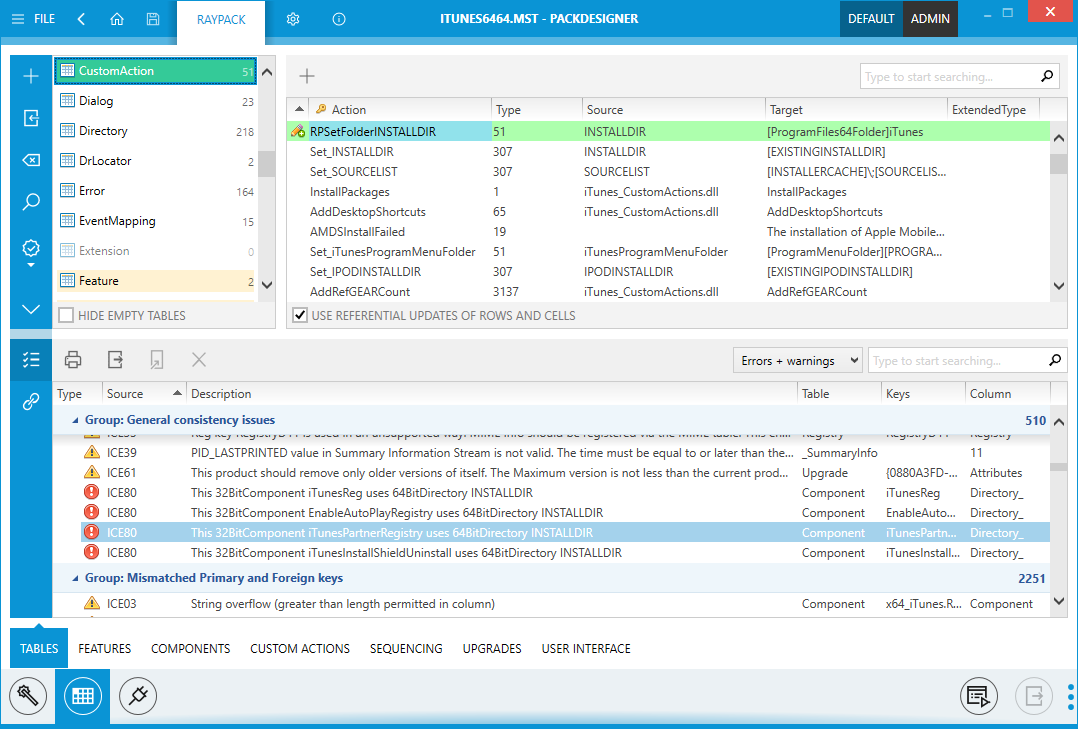
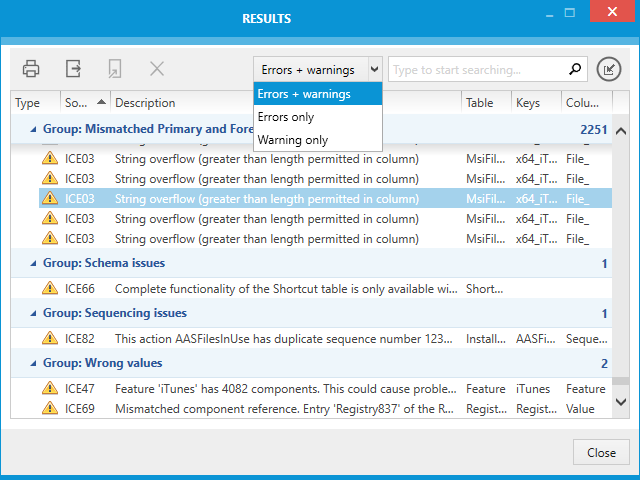
Once RayPack has executed any standard or custom ICE validation procedure, a validation result panel becomes visible, displaying any issue (warning or error) that arose. If all rules reported successful tests, the result panel is not displayed at the end of the validation procedure.
Hiding / Showing and Resizing the Validation Results
The validation results can be temporarily hidden / shown by pressing the collapse / expand button:

The bottom panel can be resized by dragging and dropping its upper separator between the tables and the panel itself.
Since the bottom panel is also used to display the row reference tracking results, the following buttons can be used to enable / disable the validation results:

Shows ICE / test results

Hides ICE / test results and shows row tracking results.
Troubleshooting Validation Results
With a double-click on any row of the validation result table, the TABLES editor is updated to load the contents of the affected table and focus the specific cell that caused the issue report.
Besides the direct result linking, RayPack supports packagers in their aim to readjust contents that caused validation issues with a special highlighting scheme for tables and cells: Red background for table names or cells indicates that an error was reported, whilst yellow background indicates a warning. Please refer to the Highlighting & Color Codes topic for further information on highlighting schemes used within the TABLES editor view.
The Validation Result Table
No matter if the result table is displayed in the integrated or external panel dialog, it always contains the same set of columns:
•Type: Result items may either be a warning or an error. The type column contains an icon that indicates what kind of severeness the result item has.
•Source: The ICE rule that reported the issue
•Table: The table that was analyzed when the issue was actually found. Since some issues depend on relation integrity, the table named here may differ from the background-information given within the description column.
•Keys: The key value(s) of the row that was analyzed when the issue was actually found. Since some issues depend on relation integrity, the key named here may differ from the background-information given within the description column.
•Column: The name of the column that was analyzed when the issue was actually found. Since some issues depend on relation integrity, the column named here may differ from the background-information given within the description column.
•Description: A textual description of the report reasons. Please read the text carefully to get hints on how to solve the object constellation which caused the report.
Validation Result Action Options
Sort Validation Results
The table that contains the ICE validation results may be sorted by each of the visible columns either ascending or descending. To sort the result according to the values displayed within a specific column, users simply click on the header of the desired column. An arrow icon indicates the current direction. To switch between ascending and descending direction, another click on the very same column header is executed.
The sorting algorithm allows simple ordering, it is not possible to stack sort orders for several columns as multi-level sorting.
Filter Validation Results
The column headers of the validation result table contain cone icons. With a click on that icon users may filter the rows of the result table to display only those with a specific content. The option list displayed in the filter menu shows all varieties of content values plus the option to show only rows with blank cells in this column, or to de-activate the filter and show all columns again.
Filters can be stacked by simply selecting required values for several columns at the same time. To do so, the result pane has to be popped-out for advanced sorting.
|
Note: The features described below can only be triggered when the result pane is popped-out as a separate dialog. |
Advanced Sort and Group for Validation Results
To group validation results by one or more specific column types, users have to activate the advanced sort mode to display the group bar. Once the group bar is visible, column headers may be dragged there from. As soon as the column is dropped inside the group bar area, the table contents are automatically and immediately grouped. Each value group is summarized by a header row within the tables data section. These header rows are collapsed by default. To expand them, the arrow icon on the left of the header label has to be clicked. Clicking it again collapses the section again. By dragging further column headers to the group bar, arbitrary combinations of multi-level grouping are available.
Whilst columns are used for grouping, it is possible to sort for each column ascending or descending. Therefore, in the advanced mode, multi-level sorting is available. It is also possible to activate the column based filter to reduce the visible data rows to a closely focused work set.
The advanced group and sort criteria has to be removed manually. To do so, users have to drag the header blocks back into the original table header bar. The column is displayed wherever users drop them, which allows to individually adjust the table structure.
Print Validation Results
Within the activity bar of the popped-out validation result panel, users have access to the print button. Clicking it immediately opens the print dialog with available print options for the current packaging machine. Please configure the print procedure as required.
Export Validation Results
Validation results are not permanently available in RayPack. Once the result pane is closed, former result lists are no longer restorable. Users have to execute the validation procedure again. If any changes have been applied to the packaging project contents since the last validation run, the new results may differ from the former ones. Therefore, exporting validation results is required for later reference.
Within the activity bar of the popped-out validation result panel, users have access to the print button. Clicking it opens a system explorer dialog. Please select the desired target location, file name and type for the data export. Available target formats are XLS(X), HTM(L), PDF, and CSV / TXT. Each target format has benefits towards specific data handling requirements: Whilst PDF is quite handy for transferring human readable information, other target formats are better fits for analysis and data transfer between applications.
Search Within Validation Results
Within the activity bar of the popped-out validation result panel, users have access to the control for keyword search procedures. At the upper right corner of the result pane, users enter one or more keywords into the input field. The keyword filter is applied immediately, so that entering one letter after another reduces the displayed result set step by step. To display the whole result set again, simply remove the keyword from the input field.
Keyword search and advanced sort & group features may be stacked to create the optimal result set for the current task context.
Display Modes of the Validation Result Pane
The result panel is by default displayed in its popped-in mode (see screenshot below). This mode adds a third information area to the TABLES editor interface, allowing to display validation issues, the list of packaging project tables, and the content of a specific table at the same time within the same application window.

Especially for packagers who work with several monitors, it is quite handy to pop-out the ICE results panel. Using this display mode, results may be used as additional reference, but do not block screen space required to gain an overview on the database and table content of the currently analyzed project.

To close the validation result pane, both view modes contain a CLOSE button right next to the button for view mode switching.
Exceptional Validation Results
Whenever RayPack encounters issues with the initiation of the validation process in general or the execution of particular ICE rules, the result table contains error messages. This is a difference to the standard defined for ICE validation, since RayPack does not label these issues as failures but errors. However, issues that prevent ICE validation from execution are usually caused by structural deficits of a package or packaging project. Severely damaged database tables may be the result of incomplete file transfers or storage errors.
Further possible reasons for failed ICE validations are invalid CUB files. Especially custom validation rule sets that have been imported to RayPack may cause issues if they do not conform to the CUB file format standard.
Clearing Validation Results
In order to remove the highlighting and ICE validation results, click on the Clear the results button:
