In order to add an IIS application pool to a packaging project, users go to the IIS view of the Visual Designer mode.
•With a click on the Create new... button, the options menu is displayed. Click on Application pool to invoke the New Application Pool Wizard.
•As an alternative access to the very same wizard, users may click on the Application pools node within the IIS object tree structure on the left hand side of the IIS view, and click on the Add new application pool button that is displayed within the details pane at the right-hand side.
Work your way through the steps of the wizard to define all required properties for the new item.
At any time, using the Next or Back buttons, which are displayed at the bottom of the wizard dialog, allows to navigate within the already processed steps.
To exit the wizard without creating a new object, use the Cancel button, also located at the bottom of the wizard dialog.
Step 1: Scheduled Task
Task name
The name of the task as it will be displayed within the target systems task scheduler interface. The name should be unique, and has to be given as a string of max. 255 characters.
Step 2: Component
Component
Each scheduled task has to be related to a component item of the packaging project.
To select an existing component as parent object of the scheduled task, users click on the downwards-pointing arrow at the right-hand side of the component selector control. A list of existing components is displayed. The actual selection is done with a click on any of the given components.
To create a new component for the scheduled task, users click on the browse button [...] at the right-hand side of the component control. The common dialog type Select Component is displayed, ready for creating and selecting components.
Step 3: Task Run
Task run
A value that specifies the path and file name of the task to be run at the scheduled time.
Arguments
The parameter arguments that have to be passed to the executable defined as task run.
Working directory
An optional value that specifies the the working directory for the executable defined as task run.
|
Note: As indicated by the square brackets ("[]") at the right hand side of the input fields for task run and working directory, it is possible to make use of syntax suggestions to define their values. Simply enter an opening square bracket ("[") to display the list of available suggestions. Select the desired value from the list to add it to the already entered value of the input field. The actual value at run time will be used for the scheduled task definition. |
Step 4: Schedule Type
Select one of the predefined schedule types:
•Once - the task will run once, at a specific date and time
•Daily - the task will run every day at a specific time
•Day of month - the task will run on a specified list of months and days during a defined calendar period, each at the generally specified time
•Weekly - the task will run on a selection of weekdays at a specific time
•Week of month - the task will run on a specified list of months, weeks and days during a defined calendar period, each at the generally specified time
•Idle - the task will run after a specified period of idle time
•System Start - the task runs each time the computer starts up
•Logon - the task runs each time a user logs on to the computer
The upcoming step Schedule Details will be adjusted to request exactly the scheduling settings required for the type selected within this step. Since System Start and Logon do not need no further specifications, RayPack skips the details steps for these types.
Step 5: Schedule Details
Once
The start time is defined as HH:MM:SS for the local target machine time zone (e. g. 16:43:00 equals 4pm 43 minutes and 0 seconds).
The start date is defined as MM/DD/YYYY for the local target machine time zone (e. g. 03/02/2015 equals the 2nd of March 2015).
Daily
Start time - see above
Start date - see above
The end date is defined as MM/DD/YYYY for the local target machine time zone (e. g. 05/06/2015 equals the 6th of May 2015).
An integer value that refines the schedule type to allow for more detailed control over the schedule recurrence. If it is set to 1, the scheduled task will be executed exactly once. If it is set to 99, the scheduled task execution will be triggered 99 times (which equals 99 days in a row for a daily schedule type).
Day of Month
Start time - see above
Start date - see above
End date - see above
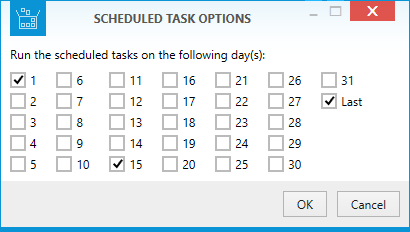
A value that specifies the day(s) of the month to run the task on. A comma (,) has to be used to separate a list of month days.
Please use the browse button [...] at the right-hand side of the input field to get support for the definition of more complex day selection.

Within the displayed Scheduled Task Options dialog, activate the checkbox at the left-hand side of the month day number. Note that due to the irregular number of days per month (28,29,30,31), there is the additional option "Last", which makes sure that the task is run at the last day of the month, no matter how many days the month actually has.
Hit OK to copy the defined set of days into the parent scheduled task wizard step and close this dialog. Hit Cancel to discard the selection without taking it over to the parent scheduled task wizard step.
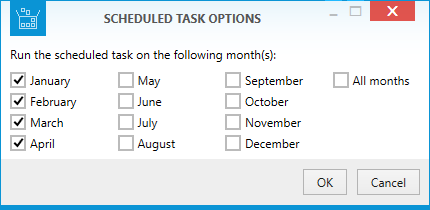
A value that specifies the month(s) of the year to run the task on. A comma (,) has to be used to separate a list of month names.
Please use the browse button [...] at the right-hand side of the input field to get support for the definition of more complex month selection.

Within the displayed Scheduled Task Options dialog, activate the checkbox at the left-hand side of the month name. Note that due to the tendency of people who work with IT to be lazy, there is the additional option "All months", which enables / disables all checkboxes at once.
Hit OK to copy the defined set of months into the parent scheduled task wizard step and close this dialog. Hit Cancel to discard the selection without taking it over to the parent scheduled task wizard step.
Weekly
Start time - see above
Start date - see above
End date - see above
Interval - see above
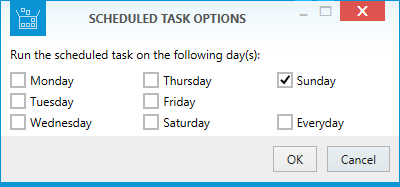
A value that specifies the day(s) of the week to run the task on. A comma (,) has to be used to separate a list of day names.
Please use the browse button [...] at the right-hand side of the input field to get support for the definition of more complex day selection.

Within the displayed Scheduled Task Options dialog, activate the checkbox at the left-hand side of the day names. Note that due to the tendency of people who work with IT to be lazy, there is the additional option "Everyday", which enables / disables all checkboxes at once.
Hit OK to copy the defined set of week days into the parent scheduled task wizard step and close this dialog. Hit Cancel to discard the selection without taking it over to the parent scheduled task wizard step.
Week of Month
Start time - see above
Start date - see above
End date - see above
Week
Select one of the predefined options:
•First
•Second
•Third
•Fourth
•Last
Note that due to the irregular number of weeks per month, there is the additional option "Last", which makes sure that the task is run at the last week of the month, no matter how many weeks the month actually spreads across.
Days - see above
Months - see above
Idle
Idle time
The idle time has to be given as integer number of minutes, calculated from the moment of screen saver activation.
Step 6: Security
User
RayPack allows to run scheduled tasks either via Windows Authentication, or as a specific user.
The default setting is Windows Authentication, indicated by the active checkbox Use Windows Authentication. To enable the usage of individual user credentials, the checkbox needs to be deselected. Once it is inactive, the controls for user object management become active for user selection.
Individual user credentials have to be given in the form of a user object. To select or create a user object, click on the browse button [...] at the right-hand side of the user input field. The Select User dialog is displayed. Please refer to the Common dialogs section for further details on how to manage user data objects.
|
Be aware: User objects may very likely be used at several places within SQL database, script, and IIS management structures. When the same user item is referred to from different locations, changing the properties of that user item actually takes effect for all related objects. Please double-check the correctness of user profile changes, and make sure all related objects are still valid and operational with the modified set of properties. |
Step 7: Summary
Use the summary page to check the correctness of the scheduled task properties that were defined during the previous wizard steps.
•If all properties are set as required, click Process to finally create the scheduled task item.
•If changes are due, click Back until the wizard step with the incorrect property definition(s) is displayed and make modifications as required.
Please note that changes in an early step may lead to different defaults or options in any later step. Therefore, please verify that all steps contain the desired settings whilst NEXTing to the summary page again.
Step 8: Finished
Once the new scheduled task object has been created, the wizard can be closed by using the Finish button at its lower right corner. The Scheduled Tasks view is updated, and the list of existing items contains the newly created object.