|
Tip: There are sample templates for plug-in usage, delivered along with the RayQC application resources. As soon as RayQC is installed, samples are stored within the RayQC program folder (e. g., C:\Program Files (x86)\RayQC\Samples\Sample Checklist.rqct, which is designed to present some functions of the RayQC plug-ins, along with their configuration options). |
The following procedure outlines the standard requirements for plug-in configuration. Additional information regarding the relevant activities for custom plug-in preparation is provided in a later section.
1.Plug-ins are triggered from checklist elements, therefore the initial starting point for any plug-in usage is to create a checklist that contains at least one element that can incorporate a plug-in: a Checkpoint, Data Field, or Multi-Option element. Please note that it is not possible to add plug-ins to Information elements, as the return value of the plug-in function execution updates the element result content, and Information elements do not have a result value at all.
2.Open the checklist template file for manipulation within the Checklist Editor tab Steps and Actions.
3.Users will later trigger plug-in execution from the box representation of an element (within the Checklist Viewer). Therefore, focus the element that should later contain the plug-in trigger button by clicking on it. Activate the plug-in tab of the element within the Details pane on the right-hand side.
4.Browse the plug-in list at the left-hand side of the editor interface. Expand the list of functions per plug-in by clicking on the arrow icon left of the plug-in name. Once the right function is found, drag it to the desired checklist element within the checklist structure column in the middle of the application screen (or directly to the Details pane's plug-in tab of the currently selected element), and drop it there.
If it is not possible to drop the function at the desired target element, there is a mismatch between the supported parent element types of the plug-in function and the type of the target element. Please refer to the Internal plug-ins section to research the valid function / element combinations for internal plug-ins. If external plug-ins are used, the definition of allowed target elements per plug-in function can be retrieved from the plug-in manifest file.
Please note that each checklist element (except for groups and information elements)can be extended with zero or one plug-in functions. It is not possible to add two or more functions to the very same checklist element.
5.Once a plug-in function has been added to a checklist element, the functions details are displayed within the plug-in tab of the details pane for the checklist element. These details do not only contain static information about plug-in name, plug-in version, and function name, but also the controls for individual adjustments of input parameter values, execution options, and result handling settings.
6.Please refer to the plug-in documentation for further details on the list of parameters for a specific function. The documentation for internal plug-ins is available within this document. The specifications for custom (external) plug-ins have to be provided by the plug-in author.
The following example uses the internal File plug-in as base for a configuration description. The specific function that is about to be executed is GetProperty, which allows retrieving either the version or size property of a specific file. (Once the property is read, another plug-in function may be used to evaluate the result. To compare the property with a specific value, users may add another checklist element and use the Logic plug-in function CompareValue.)
7.Input parameters can be defined by manually entering a static value or by reading the current value of another checklist element.
To use the value of a checklist element as input parameter value, users have to drag the checklist element from the checklist structure area in the middle of the screen and drop it into the desired plug-in function input parameter control within the details pane.
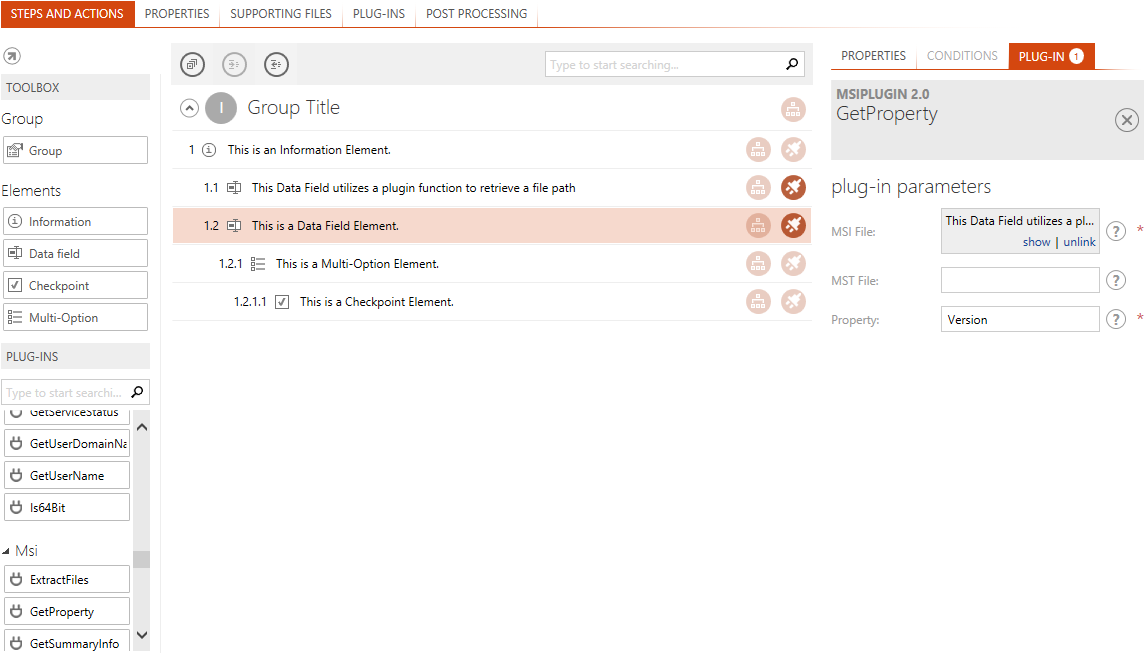
Please be aware that this kind of relation can only be established if the checklist element that is used as parameter value has already been evaluated when the current plug-in is executed. This means that it is not possible to use an element that has a later position within the checklist element structure than the element that contains the plug-in itself. For the situation displayed within the screenshot below: Element 1.1 may be used as input parameter reference for element 1.2 or any later element, but 1.2.1 may not be used for 1.1 or 1.2.

The selected element 1.2 has been extended with a plug-in function. The input parameter File is defined by the value stored within another checklist element: 1.1.
The functions of the File plug-in on the left hand side are expanded and contain the GetProperty function, which has been added to element 1.2. A look at the details pane on the right reveals the currently established usage connection, as the plug-in and function name of the related logic are displayed here.
8.Let us take a closer look at the input parameters for the GetProperty plug-in function:
File
The name and path of the file whose property has to be checked. In our example we have an element with the index number 1.1 as reference value for this parameter. Element 1.1 itself is equipped with a plug-in function that allows selecting a file via a system browser dialog: FileOpenDialog. Therefore, once the plug-in of element 1.1 is executed, its value is set to the name and path of the selected file.
Property
The file name and path described above is used to retrieve the file property Version as result of element 1.2. The input parameter property has two options users may select from: Version and Size.
9.Now that the ingoing data flow is defined, a question might arise: Where does the result of the plug-in execution go to? Well, the current definition of internal plug-ins is restricted to allow exactly one outgoing (result) parameter per function. The return value of the function execution is automatically used as value of the element that hosts the plug-in function itself.
Therefore, in our example described above, the result of the file property retrieval is written into the Data Field element 1.2, as well as the result of the FileOpenDialog function execution is written into the Data Field element 1.1. Within the Checklist viewer, users are able to see the function result as value of the control item that represents the element. In our example, the file path and the file property are entered into text input fields.
Executing functions hosted by Checkpoint elements leads to the selection of either Yes or No. (Please keep in mind that Yes is usually the same as evaluates to true, but evaluates to true may as well be equal to No if the expected result of the element has been switched. Please refer to the element type descriptions for further information!)
The third option for result parameter value indication within the Checklist Viewer is the auto-selection of an option from a Multi-Option drop-down menu.
Since result values may not be provided in a standardized format, or easily usable for further evaluation, there may very well be need to format transitions and comparisons. Please take a look into the section about the internal Logic plug-in and its functions to find out how RayQC can support the individual QA test scenario requirements.
10.As soon as the configuration is done, the plug-in execution may be tested. To do so, users have to switch to the Checklist Viewer interface. Please keep in mind to save changes made to a checklist template in the meanwhile in order to prevent data loss.
11.Within the Checklist Viewer, evaluate the whole set of checklist items until the ones with the plug-in functions are reached. It is very common that plug-ins require results of prior elements as input parameters. The plug-in execution would fail if there were missing element results that are actually referred to by plug-in parameters. Therefore, it is recommended to run through the entire checklist evaluation course to make sure the parameter call is triggered from a realistic checklist status.
12.From the Checklist Viewer, users may check the existence of mandatory input parameter definitions for the defined plug-in function executions by using the Validate plug-ins data button from the Swipe bar. If RayQC encounters any issues, a message is displayed. Clicking on the MORE button reveals details on the erroneous parameter set. The info message refers to the element by naming the group index, which is represented by a roman number (e. g., I; II; III), followed by the element index value, which is represented by a period separated list of Arabic numerals (e. g., 1; 1.1; 2.4.3.1). The combination of these two index values unambiguously determines the affected element. To solve the stated parameter validation issues, users have to switch back to the Checklist Editor interface and edit the plug-in parameters of the mentioned elements.
13.However, if the plug-in execution does not run as expected, adjust the configuration, use the troubleshooting advice provided within this document, contact your local RayQC system administrator, or send a support request to Raynet: support@Raynet.de.
Show Dependencies
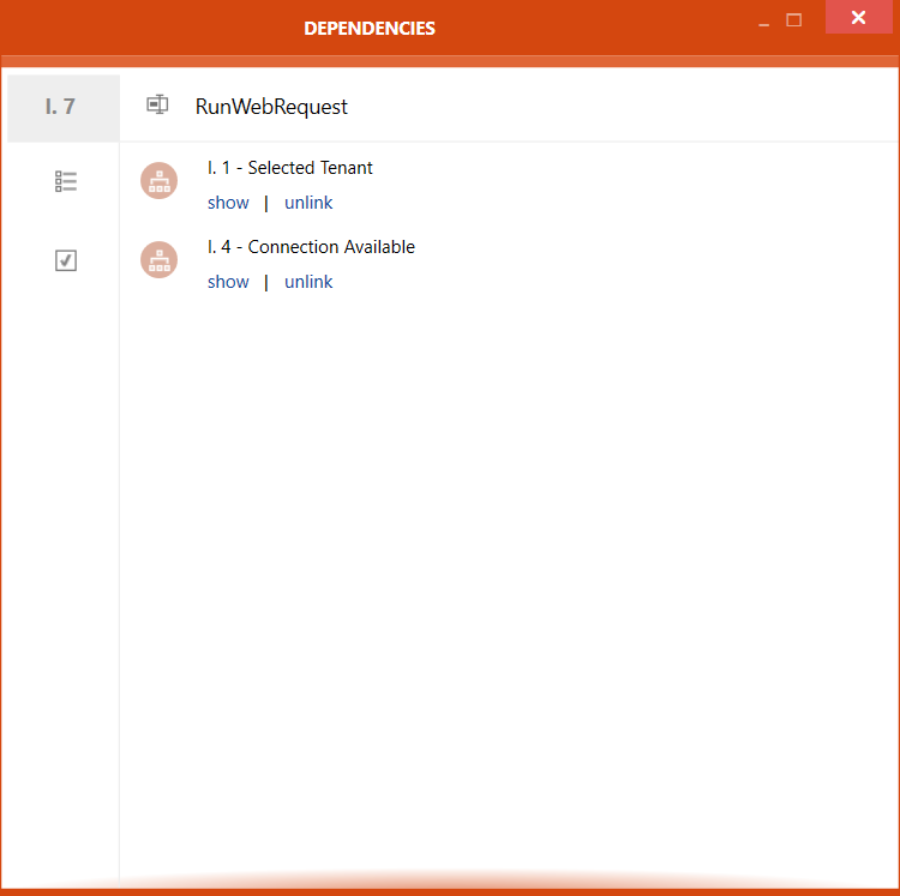
It is possible to view the dependencies of a plug-in by right-clicking on the plug-in and selecting the Show dependencies option from the context menu.

In the DEPENDENCIES dialog, the different dependencies of a plug-in will be shown. In the top the plug-in itself, its location in the checklist, and its type is shown. Below the plug-in itself, all plug-ins that are dependencies for the plug-in will be listed. It is possible to take a closer look at a specific dependency by clicking on the show button while clicking on the unlink button will remove the plug-in as a dependency.