With RayPack, files and folders can be imported to an MSI / MST / RPP based projects on build time. The scenario is particularly useful if one of the following applies:
•The packaging project is created for self-made application, with a lot of resources that change constantly (for example in terms of folder structures, names of files etc.)
•A folder containing a lot of files (40 000+) has to be imported
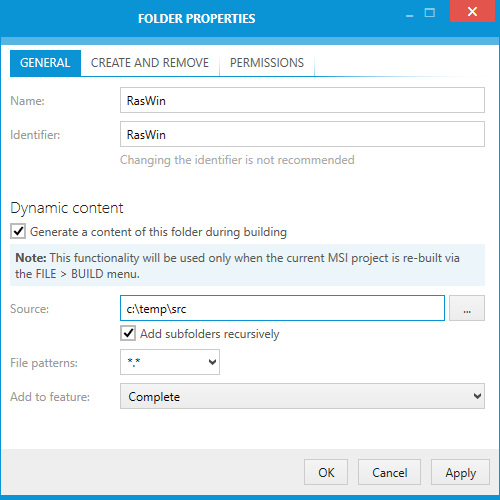
Linking a physical folder on a hard drive to a folder present in RayPack project can be configured from the folder properties dialog.
|
Be aware: RayPack creates components and automatically assigns new random GUIDs to them. This means that projects using the "linked folders" functionality may be less suited for upgrade scenarios, because two packages created one by one will have different component identifiers.. |
The linked folders are resolved on the build-time. It means that if a linked folder is configured for an MSI / MST project, no files will be added to the MSI / MST unless a full rebuild of the package using the FILE > REBUILD menu is done. RayPack shows a warning inside the Folder Properties Dialog if the current project is not RPP.
To Define a Linked Folder
1.Select or create a folder to which files and folders are to be imported on build-time in the Files and Folders view
2.Right click the file and choose Properties… menu item from the context menu
3.Tick the checkbox Generate the content of this folder during building
4.The linking options will be expanded:
Source
The source folder from which the content will be imported on build-time. In order to include subfolders recursively, tick the checkbox Add subfolders recurisvely.
File Patterns
The wildcard string to import only specific types of files. For example, typing *.exe will import only executable files. To import all files, leave this field empty or type *.*
Add to Feature
Select the feature to which imported components will be assigned. This field is required, so make sure there is at least one feature in your project before setting up the linked folder.

5.To build the project, press FILE > BUILD and select the target format.
|
Be aware: The source folder selected above will not be imported itself. It serves as a root of content to be imported, meaning only its children (files and folders) will appear in the output file in the specified target folder. |
Using Variables to Reference Source Paths
For advanced scenarios, variable paths can be used to determine the source of physical files. Refer to the following sections for more information: