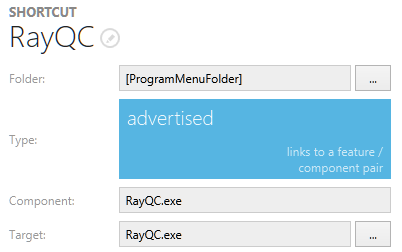
Once a shortcut has been created, its properties can be adjusted. To do so by using the Visual Designer mode interface of PackDesigner, users select the shortcut from the list of all shortcuts on the left-hand side of the Shortcuts view.
As soon as an item is selected, RayPack loads its properties into the edit form at the right-hand side of the Shortcuts view.

The following settings are visible and (partially) modifiable within the edit shortcut form:
Name
For details regarding the renaming procedure for shortcuts, please refer to the Rename a shortcut topic.
Folder
This is the folder in which the shortcut will be created. To change the value, use the browse button that is available right next to the read-only input field, and use the Select a folder dialog.
Type
Shortcuts can be either advertised or non-advertised. To change from advertised to non-advertised or vice versa, users have to click on the tile. All depending shortcut properties are changed along with the type setting.
Component
Whenever a shortcut is created, RayPack automatically generates a component specifically for this shortcut.
For advertised shortcuts:
The component property is not modifiable, since RayPack automatically stores advertised shortcuts in one of the packaging project default components. By default it is named [Product Name]_AllOtherFiles (the actual default depends on the settings of the currently used RayPack settings profile. Please refer to the Settings section for details regarding common naming conventions used within PackDesigner).
For non-advertised shortcuts:
The component property is modifiable. Click on the name of the currently selected component to display the list of component alternatives to choose from. If advanced component manipulation options are needed to define the correct component for the shortcut, then click on the browse button [...] right next to the selection box to display the SELECT COMPONENT dialog.
Target / Command
For advertised shortcuts: Target
Click on the browse button [...] right next to the read-only Target input field to select a file by using the standard package file browser interface.
For non-advertised shortcuts: Command
If a shortcut has been created directly in RayPack's PackDesigner, it will mostly look similar to something like this: [FOLDER]file.exe. However, there are other options for the format of this setting, e. g. something like [#file.exe]. In order to be able to cover the wide spectrum of possible notations, RayPack offers both - syntax suggestions for property usage (simply type an "[" into the input field to get suggested contents to pick from), and a dialog to select one of the resource files within the packaging project (click on the browse button [...] right next of the Command input field to select a file by using the standard package file browser interface).
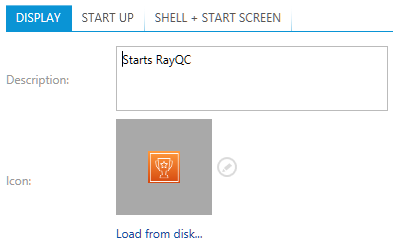
Tab: DISPLAY

Description
The value for description is mere information for the end-user, explaining details about the shortcut. For example, where the shortcut points to on the system.
Icon
Each shortcut may be visually augmented with an icon. Packagers may either pick one of the already existing icon resources from the current packaging project or add a new icon by loading it from the local disk. If an icon has been added to the shortcut, a preview is shown as visible icon in the collapsed icon resource selector interface.
To pick an existing icon resource:
1.Users expand the icon resource selector interface with a click on the downwards arrow icon next to the standard icon.
The list of icon resources stored within the packaging project is displayed.
2.Select the desired icon from the list on the left-hand side of the selector interface and if required, navigate to the icon index that should be used. Use the arrows pointing to the left and to the right to change the currently active icon index value.
3.Click somewhere outside of the icon resource selector interface to save the current setting for the shortcut icon.
To load a new icon resource from disk:
1.Click on the "Load from disk..." link under the preview panel for the current shortcut icon state.
2.Use the New Resource wizard to specify import options
3.By clicking on the Finish button the icon is loaded into the project
4.Click on the icon selector to choose the newly imported icon.
|
Be aware: When the shortcut icon is changed, the former used icon resource is not removed from the packaging project. Nonetheless, when a new icon is loaded into the project, a new, permanent icon resource is added to the packaging project. Please make sure to manage icon resources via the controls of the Resources view if required beyond the needs of the current shortcut object manipulation. |
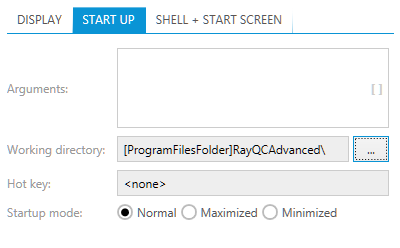
Tab: STARTUP

Arguments
Here are the command-line arguments for the shortcut. Note that the resolution of properties in the Arguments column of the Shortcut database table is limited.
When properties are used within this column value, the actual value of the property must have been resolved already once the shortcut is created on the target machine.
Working Directory
The folder selected for this value is displayed as the "Start in" setting within the properties dialog of a shortcut on the target system. The working directory is the default for file opening and saving operations and the current directory used by the invoked application.
Please refer to the Select a folder topic within the Common Dialogs section for details regarding the interface handling of the SELECT A FOLDER dialog, which is used for the definition of the working directory.
Hot Key
To define a hot key for the new shortcut, packagers click into the usually greyed out hot key input field. As soon as the background color of the input field has switched to white, the next combination of keys pressed on the keyboard is recorded as hot key for the shortcut object. It is possible to use a single keystroke or a combination such as Control + Shift + b.
|
Note: Hot keys should only be added to shortcuts if the customers installation description demands to do so. Conflicts between already existing hot key settings on the target device may lead to the experience of inconvenient system behavior for the end user. |
Startup Mode
Decide the behavior of the target application window when the shortcut is executed. Select one of the available options for the Run property of the later Windows shortcut object:
•Normal window - the application is invoked with the standard settings saved for the application.
•Maximized window - if no (user-) specific settings override this command, the invoked application covers the whole screen.
•Minimized window - if no (user-) specific settings override this command, the invoked application resides minimized in the task bar.
|
Note: Some programs override the Run property injected by shortcuts. For those applications, packagers have to check whether there is a way to alter this behavior. The Run property works for programs and shortcuts to programs, but not for other target file types. |
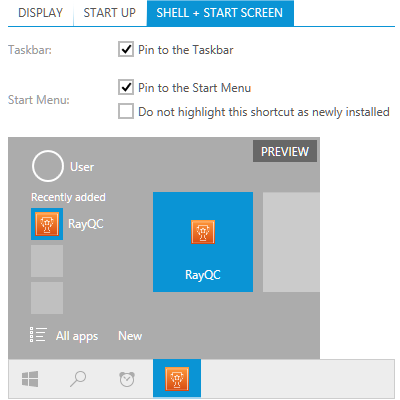
Tab: SHELL + START SCREEN
This tab consist of two section: one for checkboxes controlling the behavior of a shortcut and a preview area which shows a visual representation of currently selected combination of options.

Pin to the Taskbar
Control whether the shortcut is pinned to the Windows Taskbar. This functionality is only valid for Windows 7 and newer.
|
Note: Using this option requires that the shortcut is non-advertised. If you try to enable this option for an advertised shortcut, it will be automatically converted into a non-advertised shortcut. |
Pin to the Start Menu
Control whether the shortcut is pinned to the Windows Start Menu. This functionality is only valid for Windows 7 and newer. Pinning to start menu is not available on Windows 8.1.
|
Note: Using this option requires that the shortcut is non-advertised. If you try to enable this option for an advertised shortcut, it will be automatically converted into a non-advertised shortcut. |
Do Not Highlight This Shortcut as Newly Installed
Control whether the shortcut is displayed in the Recently added section (naming may vary depending on version and language of the target Operating System).
|
Note: This option requires Windows Installer Schema 500. If the current schema is lower than 500, RayPack will prompt for confirmation before converting the schema to the required version. |