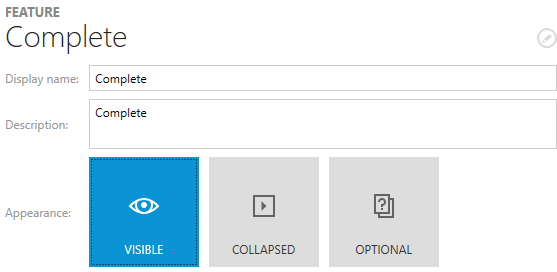
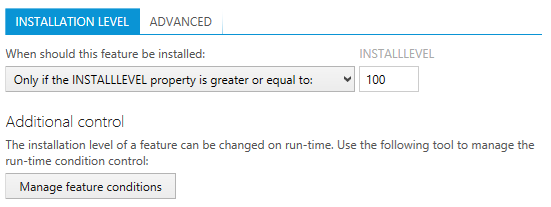
Once a feature is selected from the tree view structure on the left hand side of the Feature view, the current settings are displayed within the details pane on the right. Since the properties are immediately displayed in a form view with decent control interfaces, there is no need to call an additional edit view to make changes to the settings. Users can change the displayed values and settings and simply change to another feature, view, or mode all while having the changes saved as part of the changes done during the current session.
The following feature properties are modifiable via the Feature view of the Visual Designer mode:
Feature
Affected Feature table column: Feature
The unique identifier for a feature.
See Rename a feature for details
Display Name
Affected Feature table column: Title
This is the feature label as it is displayed during package setup execution. If the setup is defined to allow users to actually see (or manipulate) the set of installed features, this is the value users see.
Description
Affected Feature table column: Description
This is the feature description as it is displayed during package setup execution. If the setup is defined to allow users to actually see (or manipulate) the set of installed features, this is the value users see when they pick the feature from the list of available features.
Appearance
Affected Feature table column: Display
The two basic decisions made here are, if the feature is required, which means the user cannot de-select it in any kind of custom setup configuration step, and if the feature is visible, which decides whether the user is aware of the existence of the feature as a functional unit of the installed application or not. Both settings can be made independent from each other. A third decision is only available for visible features: By activating the "This feature is expanded" checkbox, the custom installation step is loaded with the whole tree structure of child features visible. This is handy for those constellations where a specific feature has to be installed, but with a highly customizable set of optional sub selections, e. g., with a wide list of available, yet optional language packs for an application.
Tab: INSTALLATION LEVEL
INSTALLLEVEL
Affected Feature table column: Level
By default, all features with an install level less than or equal to the value of the INSTALLLEVEL property of the package are installed during setup. This INSTALLLEVEL comparison is executed at runtime.
By selecting never or always, this default behavior can be replaced. It is also possible to enter a specific (integer) value as required INSTALLLEVEL.
Conditions
Affected Installer database table column: Condition
RayPack allows to install features conditionally. Clicking the MANAGE FEATURE CONDITIONS button opens the Condition table within the Advanced mode TABLES view for direct data row creation.
Tab: Advanced
Destination
Affected Feature table column: TargetPath
This value defines the directory into which the resources for the feature are installed during setup runtime. The default setting is the INSTALLDIR defined for the whole Installer package. To change that default, users should click on the button right of the destination path info display.
Read the Select a folder section for details about the interface handling.
Advertised
Affected Feature table column: Attributes
Windows Installer can advertise the availability of an application without installing the application. If an application is advertised, only the interfaces that are required for loading and for starting the application are presented. If the advertised interface is started, Windows Installer installs the required components. This method is also referred to as installation-on-demand.
The default setting for RayPack packaging projects is to generally allow advertisement as an optional selectable functionality, but not to activate it from scratch. In order to mark a feature to be advertised by default, packagers set the Advertised value Favor Advertise.
Alternative settings are to disallow advertisement altogether or prohibit advertisement on target os that do not support installation on demand. The last two options take away the advertisement-decision from the installing end-user (no matter if it is a person or software deployment system)
The advertised setting is reflected as bit wise analyzed column value.
Remote Installation
Affected Feature table column: Attributes
Discussed here is how the Remote Installation property is a default value that defines how the feature comes up when the custom setup dialog is displayed for the first time, or how the feature will be installed if the custom setup dialog is not invoked.
If a feature is visible, the remote installation state of this feature can be changed by making a selection from the context menu option set within the custom installation feature tree. However, if a component stored inside a feature has a different remote installation configuration than its parent feature, the component setting is dominant over the feature setting. Therefore, the remote installation options in the Features view are called Favor Local, Favor Source, etc.
Favor local initiates a copy of the feature sources to the features target directory on the target system, while Favor source installs a feature from the original .msi resource media (which might be stored on a remote hard drive, a network share, an USB stick or any other temporary or permanently available storage area).
The third option, Same as parent, is only available for child features and instructs the installer to apply the very same setting that is used for the direct parent feature.


