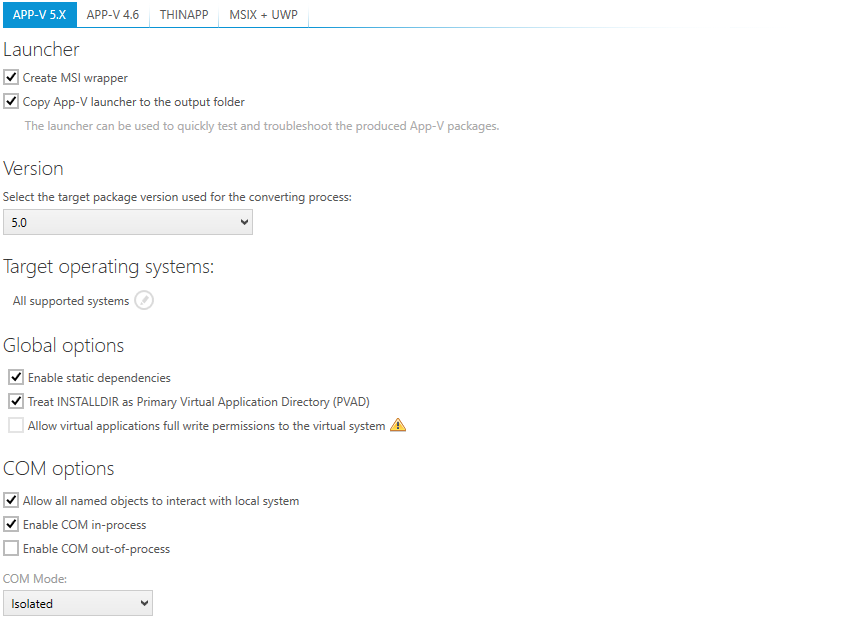
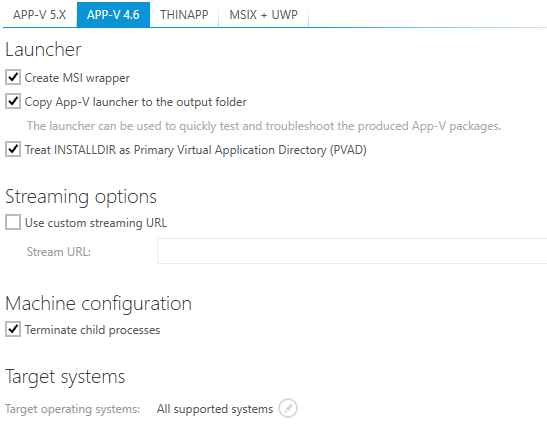
The global configuration for App-V 4.6 and 5.X conversion is available within the Settings > Conversion screen.
Options for App-V 5.x

Launcher Options
Create MSI Wrapper
If this option is selected, each time when an App-V application is built, a wrapper MSI that installs the package is created in the same folder. The MSI wrapper can be used to automate the deployment in systems which have no native support for App-V 5.X, but it can also be used to quickly install the packages in a test environment.
Copy App-V Launcher to the Output Folder
If this option is selected, each time when an App-V application is built, the App-V launcher utility is placed in the same folder as the generated App-V application. The tool can be used to start the package locally, before sending it to a deployment server.
For more information about App-V launcher, refer to App-V launcher section.
Version
This switch defines the target version of App-V packages. Depending on the selection, some features may be unavailable and the package may be not fully compatible with previous versions of App-V formats.
Target Operating Systems
If a packager does not define restrictions here, the generated package will be generated for compatible usage on all of the listed operating systems. However, by clicking on the edit button at the right-hand side of the current setting info label, the list of available OS becomes visible, ready for full or partial selection by checkbox activation.
Global Options
Enable static dependencies
When enabled, executable files contained within the package are scanned for a presence of static dependencies. We recommend to leave this setting enabled.
Treat INSTALLDIR as Primary Virtual Application Directory (PVAD)
When this option is enabled, the INSTALLDIR is converted to a root folder and all other folders are saved into VFS. If the option is disabled, then everything gets converted to VFS.
Allow virtual applications full write permissions to the virtual system
This option requires App-V 5.0 SP2 Hotfix 4 or newer
COM Options
Enable COM Subsystem
Activate this checkbox to enable the COM subsystem in general. The following options will become editable as soon as the COM subsystem is active.
Enable COM in Process
COM In Process allows a COM object to be retrieved from the GUID based COM registration by the standard Windows API. It is then loaded into the process space of the calling application itself.
Enable COM Out of Process
Enabling this option triggers the launch of the TaskHost.exe when a COM API call is detected. The TaskHost.exe handles the communication between the calling virtual application and the COM object that fully remains on the host.
Options for App-V 4.6
Launcher Options

Create MSI Wrapper
If this option is selected, each time when an App-V application is built, a wrapper MSI that installs the package is created in the same folder. The MSI wrapper can be used to automate deployment in systems that have no native support for App-V 5.X, but also to quickly install the packages in a test environment.
Copy App-V Launcher to the Output Folder
If this option is selected, each time when an App-V application is built, the App-V launcher utility is placed in the same folder as the generated App-V application. The tool can be used to start the package locally before sending it to a deployment server.
For more information about App-V launcher, refer to App-V launcher section.
Treat INSTALLDIR as Primary Virtual Application Directory (PVAD)
When this option is enabled, INSTALLDIR is converted to a root folder, and any other folders are saved into VFS. If the option is disabled, everything gets converted to VFS.
Streaming Options
Use Custom Streaming URL
The default setting for the streaming URL is derived from the environment variable. However, if this checkbox is activated and an individual path is entered, it will be used as streaming URL for this specific virtualized package.
Machine Configuration
Terminate Child Processes
If this option is active, any child process of an application that runs within the virtual environment will be terminated as soon as its main application is closed.
Target systems
If a packager does not define restrictions here, the generated package will be generated for compatible usage on all of the listed operating systems. However, by clicking on the edit button at the right-hand side of the current setting info label, the list of available OS becomes visible, ready for full or partial selection by checkbox activation.