This chapter explains how to create workflows with PackBench and how to edit an already existing workflow.

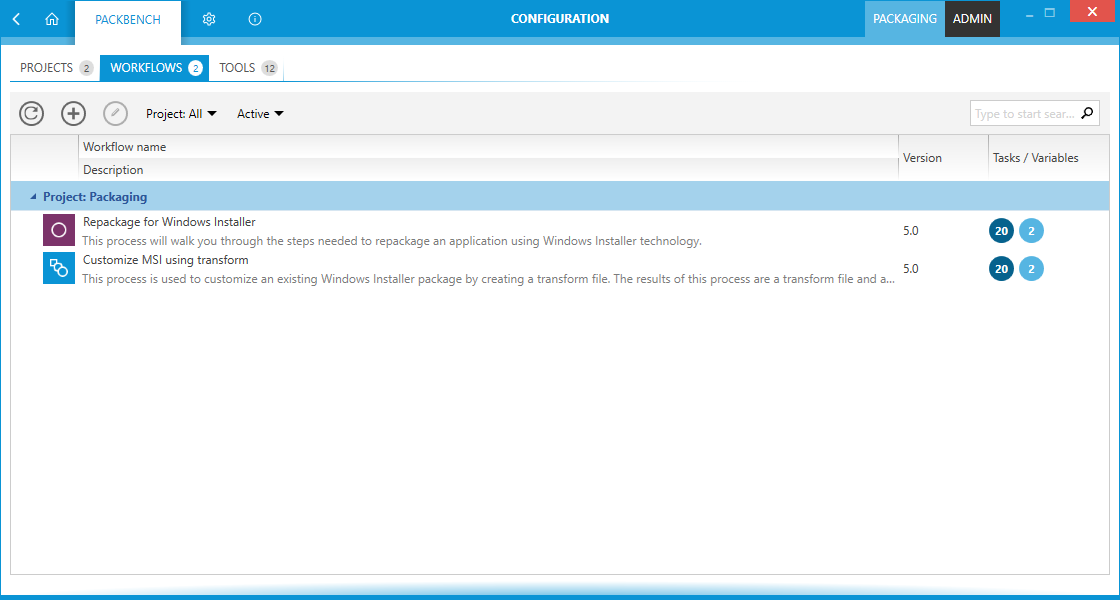
To configure a workflow left-click on the Configuration tile in the config section of the Home Screen. The CONFIGURATION view is opened. Select the WORKFLOWS tab inside of the CONFIGURATION screen.

The WORKFLOWS tab shows an action bar, the header of the content area, and the content area where the projects are shown.
Workflows Tab Header

The header of the tab is highlighted when the tab is selected. Furthermore, it shows a count of the workflows which are currently existing in PackBench. Archived workflows are still counted.
Action Bar
There are six different abilities available in the action bar.
Refresh this View Button

This button can be used to refresh the content area of the WORKFLOWS tab. If any changes have been made to any of the workflows, this button should be used to ensure that the changes are shown in the tab.
Create New Workflow Button

Click this button to create a new workflow. For more information on this, refer to the Creating Workflows section of this chapter.
Edit Tool Button

Click this button to edit currently selected workflow. For more information on this, refer to the Editing Worflows section of this chapter.
Project

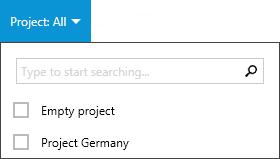
The Project button contains a dropdown menu with an integrated search function. A list of all projects of the workflows which are currently shown in the content area will appear. This list can be searched by using the keyword search field integrated into the dropdown menu to search for projects. This search field works like the keyword search field in the tab. To learn how to use the keyword search field continue with this section.
After selecting projects from the dropdown menu only workflows from the selected projects will be shown in the content area. Projects are chosen by enabling or disabling the checkbox related to the project. The title of the option will show the selected projects. If no project is selected, all projects will be shown. By default, no project is selected.
Status

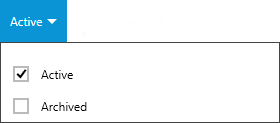
The Status button contains a dropdown menu which can be used to define which workflows will be shown in the WORKFLOWS tab. Available options in this menu are Active and Archived. Enable or disable an option by using the checkbox related to the option. If archived workflows are shown, they will be grayed out. The title of the option will also change to Active, Archived to clarify that all workflows are shown. By default, only active workflows are shown.
Keyword Search Field

The keyword search field can be used to filter the workflows. Type the keyword into the search field. The workflows will be filtered for the keyword while typing.
For example, type "sample" into the search field an only workflows which contain the word "sample" in either the Description or the Workflow name will be shown.
Sorting

It is possible to sort the content by column. Select the column and click on it to sort the workflows alphabetically. An arrow will appear next to the selected column header. To change the sort order simply click on it again. The arrow will indicate the order by either pointing upwards or downwards.
The columns themselves can be interchanged by drag and drop. Simply drag the column header and drop it at the target position. The columns can also be changed into rows by dropping the header of on of the columns underneath the other header.
Content Area
In the content area the different workflows are shown. Next to the name of the workflow there is a number which is shown in white with a blue background.

These number represent respectively:
•The number of Tasks which are present in the respective workflow.
•The number of custom variables belonging to the workflow.