After selecting Enter Text and clicking Next, the wizard continues with the remaining steps of the process (Paste the text with the license contract details for AI processing):
2. Enter text
The Enter text option allows you to paste raw text from emails, contract excerpts, word documents, or other sources so that SAM AI can extract and process the license contract information.
Paste the relevant contract text into the large input field. You can copy text directly from:
•Email bodies
•Contract excerpts
•Scanned documents that have been converted to text
Click Process text to let SAM AI analyze the content and extract relevant fields such as contract name, supplier, customer, dates, costs, and products.
 |
Best practice: |
After the text has been processed successfully, click Next to continue to the Verify data step.
3. Verify data
After processing, you reach the Verify data step. Here SAM AI presents the extracted information for review and correction.
The following fields may be displayed:
•Name*: Name of the license contract.
•Document type: Type of the commercial document.
•Invoice date*: Date of the invoice or contract document.
•Currency*: Currency of the license contract.
•Tax rate: Tax rate applied to the net amount. The default value is 0.
•Total costs (net): Shows the total contract costs excluding taxes. The value is calculated from the contract items.
•Total costs (gross): Shows the total contract costs including taxes. If the tax rate is 0, the gross amount is identical to the net amount.
•Discount rate: Discount rate applied to the contract. Enter the applicable percentage if a discount was granted.
•Customer: Organization or individual purchasing the license.
•Supplier: Organization or vendor providing the license.
•Contract ID: Unique identifier for this contract agreement.
•Invoice number: Billing document reference number.
•Purchase order (PO) number: Purchase order reference, if applicable.
•Sales order number: Sales order reference, if applicable.
•Quote number: Quote reference, if applicable.
The original text is shown in the preview pane on the right for reference.
After reviewing and making any necessary corrections, click Next to continue to the Contract items step.
4. Contract items
After verifying the contract header in the previous step, you now define the specific contract items covered by this contract. A contract item defines the purchased license rights and creates the corresponding entitlement.
SAM AI may display a confidence score for extracted contract items. This score indicates the AI's confidence level in the extraction result and is not a completion progress indicator. A low confidence score means the extracted values are uncertain — review and edit each field carefully, comparing it against the original source text and correcting any inaccuracies before proceeding.
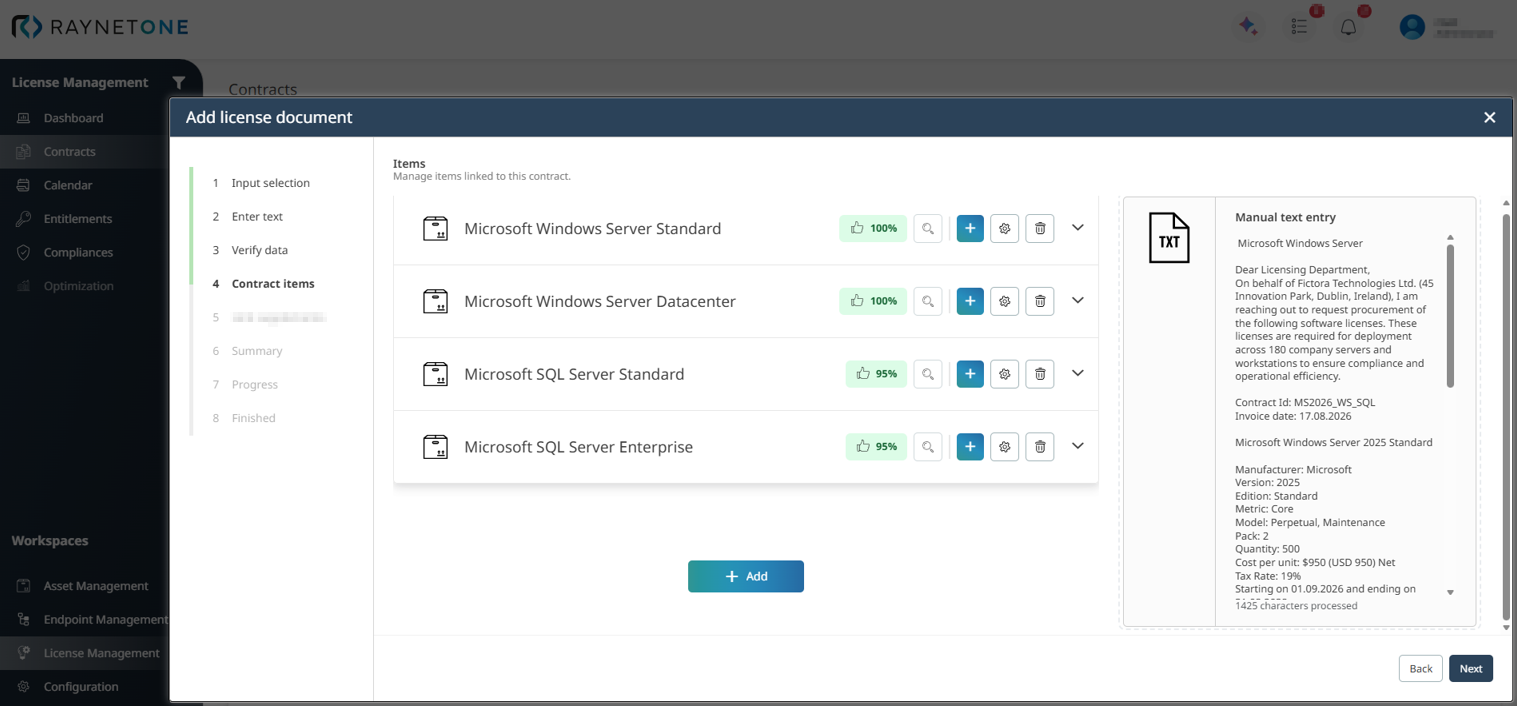
Click the settings icon on a contract item to review and complete its details. Click the + Add button to add additional contract items.
You can edit the following fields:
•Item name*: A descriptive name for the contract item.
•License metric*: Defines how licenses are counted and measured. This field directly impacts compliance calculations (e.g., Device-based, User-based, Core-based).
•License model*: The commercial model of the license (e.g., Perpetual, Subscription, Maintenance). This field determines which type of entitlement is created.
•License start*: Start date of the license entitlement. This date triggers the automatic generation of a Purchased Event in the Raynet One Calendar.
•License end*: End date of the license entitlement, subscription, maintenance period, or trial. The availability and requirement of this field depends on the selected license model.
Click + Show more fields to display additional fields.
•SKU: The manufacturer's stock keeping unit or product identifier.
•Product number: Additional internal or vendor-specific product number.
•License pack*: The packaging or bundle size of the license.
•Quantity*: Number of licenses or entitlements purchased.
•Currency: Currency of the contract item.
•Discount rate: Discount rate applied to the contract item. Enter the applicable percentage if a discount was granted.
•Unit price (net)*: Net price per license or item, excluding taxes.
•Unit price (gross)*: Gross price per license or item, including taxes.
•Billing interval: Defines the billing interval for subscription-based licenses, such as monthly or yearly. This field is disabled if the selected license model is not Subscription.
•Billing period: Defines the billing period for subscription-based licenses. This field is disabled if the selected license model is not Subscription.
•Total cost (net): Automatically calculated total cost excluding taxes, based on the entered pricing and quantity information.
•Total cost (gross): Automatically calculated total cost including taxes, based on the entered pricing, quantity, and tax information.
•Discount amount: Discount amount applied to the contract item. The default value is 0.00.
Click Save to confirm the contract item.
|
Best practice: |
After adding all relevant contract items and entitlements, click Next to continue to the Summary step.
5. Summary
In the Summary step, Raynet One shows a final overview of all contract details and linked contract items before the contract is created.
You will see two main sections:
•License contract details: All header information (contract name, contract ID, total costs (Net), total costs (Gross), invoice date, etc.)
•Items: A summary of all items linked to the contract, including configuration, quantity, and calculated costs.
Review everything carefully for accuracy.
•If something is incorrect, click Back to return to the previous steps and make corrections.
•If all information is correct, click Create to finalize and save the license contract.
6. Progress
After clicking Create in the Summary step, the wizard enters the Progress phase. Raynet One now processes the contract, validates all entered data, links the defined entitlements, and performs initial analysis using SAM AI. This step usually completes within a few seconds and requires no further input from you.
7. Finished
Once processing is complete, you will see the following success message:
License contract upload completed.
The license contract has been successfully processed and added to your license management system.
At this point, the new contract and all its associated entitlements are fully available in the License Contracts overview and can be used for reconciliation, compliance tracking, and optimization.
Click Finish to close the wizard and return to the License Contracts list, or click View details to immediately open the detailed view of the newly created contract.
|
Best practice: |