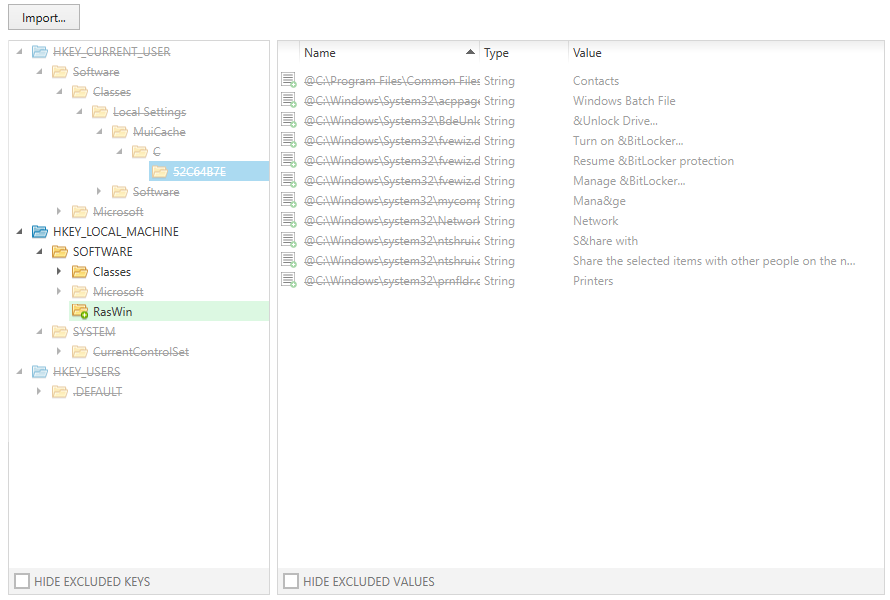
This view shows the registry keys and values of the capture project. It allows the user to add keys and values to; or exclude keys and values from the target package built from the project. It also enables the renaming of exiting registry keys and values.
The main view consists of two sections: The registry tree on the left and the value details on the right.
The Registry Tree Area
The tree displays all keys that have been recorded as relevant during the capture process.
The tree contains a root node for each hive that is present. When the Registry view is loaded for the first time, the tree is collapsed. Click on the black arrow at the left hand side of the icons to expand the tree. As an alternative, it is also possible to navigate with the arrow keys on the keyboard; simply select a hive or key from the tree and move the focus by using the up, down, right and left arrows on your keyboard.
Each hive contains keys, symbolized by icons. The icons are slightly different according to the manipulation that has been applied to the object during the capture procedure:
![]() A blank icon refers to changed content. The hive or key itself has already been present on the local machine before the capture process has been executed.
A blank icon refers to changed content. The hive or key itself has already been present on the local machine before the capture process has been executed.
![]() An icon with a plus symbol refers to a newly created key.
An icon with a plus symbol refers to a newly created key.
![]() An icon with a minus symbol refers to a key that has been deleted from the local machine during the capture process.
An icon with a minus symbol refers to a key that has been deleted from the local machine during the capture process.
The name of the key is displayed at the right-hand side of the icon. If the name is marked with red font color and struck through, it is currently excluded. Excluded resources have been recorded during the capture procedure, but are not relevant for a later target package built from the capture project.
Available Actions in the Registry Tree Area
•Exclude key
oRight-click an included key, and select Exclude from the context menu
or
oLeft-click an included key, and use Control + E
•Include key
oRight-click an excluded key, and select Exclude from the context menu
or
oLeft-click an excluded key, and use Control + I
•Export
Exporting registry keys always includes all contents below the selected item. The target format is a standard conform .reg file.
oRight-click a key, and select Export from the context menu
or
oLeft-click a key, and use Control + R
•Add a new rule regarding the object to an exclusion list
oRight-click a key, and select Add to exclusion list... from the context menu
•Hide excluded keys
Activate the checkbox at the bottom of the key listing area to hide excluded key resources from display. As soon as the checkbox is disabled, the hidden keys are again visible.
The Value Details Area
This area displays all values that are stored within the currently selected key from the tree view on the left-hand side. Values are symbolized by different icons. The icons are slightly different according to the manipulation that has been applied to the file during the capture procedure:
![]() A file icon with a pencil refers to changed file content. The file itself has already been present on the local machine before the capture process has been executed.
A file icon with a pencil refers to changed file content. The file itself has already been present on the local machine before the capture process has been executed.
![]() A file icon with a plus symbol refers to a newly created file.
A file icon with a plus symbol refers to a newly created file.
![]() A file icon with a minus symbol refers to a file that has been deleted from the local machine during the capture process.
A file icon with a minus symbol refers to a file that has been deleted from the local machine during the capture process.
The name of the file is displayed at the right-hand side of the icon. If the name is marked with red font color and struck through, it is currently excluded. Excluded resources have been recorded during the capture procedure, but are not relevant for a later target package built from the capture project.
Available Actions in the Value Details Area
•Rename value
oLeft-click a value, and use F2
•Exclude value
oRight-click an included value, and select Exclude from the context menu
or
oLeft-click an included value, and use Control + E
•Include value
oRight-click an excluded value, and select Exclude from the context menu
or
oLeft-click an excluded value, and use Control + I
•Add a new rule regarding the object to an exclusion list
oRight-click a value, and select Add to exclusion list... from the context menu
•Hide excluded values
Activate the checkbox at the bottom of the value listing area to hide excluded values from display. As soon as the checkbox is disabled, the hidden objects are again visible.
Importing Registry Content
The Import button at the top of the Registry details pane allows the importing of registry contents into the capture project. Once the button is clicked, a windows file selector dialog is displayed. Navigate to the desired .reg file, select it, and click Open. The contents will be analyzed and imported into the registry contents of the current projects.
|
Be aware: Importing keys and values that have already been present in the project before, will overwrite old data. Once registry items are imported into the project, they cannot be removed again, only excluded. |
