In order to add a new upgrade information to a packaging project, go to the Upgrade view of the Advanced mode.
Click the Define a new upgrade... button, which is available in the upper left corner of the views content area.
|
Note: If no previous upgrades have been defined so far, the list and sidebar won’t be shown. In that the case please click the Define a new upgrade... in the center of the screen. |
The New upgrade wizard is displayed.
Work your way through the steps of the wizard to define all required properties for the new upgrade information.
At any time, using the NEXT or BACK buttons, which are displayed at the bottom of the wizard dialog, allows to navigate within the already processed steps.
To exit the wizard without creating a new object, use the CANCEL button, also located at the bottom of the wizard dialog.
Step 1: Previous version
The wizard can work in semi-automated or manual mode. In the semi-automated mode, RayPack will read the necessary data from the MSI package containing the old version of the upgraded product. If you have access to the MSI, it is recommended to choose the first option “I have the package for the previous version of this application”. If you don’t have access to the sources, please select the second option “I don’t have the package for previous version of this application”. If the second option is selected, you have to manually provide a few details (UpgradeCode, language, versions etc.) in the next page.
Step 2: Details
In semi-automated mode it is necessary to specify the path of the previous package. Click the ellipsis button to open the file browser dialog, select the previous version of the package and press OK. RayPack will automatically load and display the properties of the previous product. You can also change and refine the results manually.
In manual mode, all necessary information (the UpgradeCode, language, version etc.) have to be provided manually.
|
Note: The NEXT button will be disabled until all necessary data are entered and are valid. For example, the value entered in the Upgrade code field must be a valid GUID identifier, surrounded by curly braces. |
Step 3: Upgrade type
This page is only visible if the “I have the package for the previous version of this application” has been selected on the first screen. There are three types of MSI upgrades available:
•Major upgrade
•Minor upgrade
•Small upgrade
The options available on this screen may differ, depending on the previous package details:
•Small upgrade is available only if the following is true (both must be true):
oProductCodes of the old and new application are the same
oProductVersions of the old and new application are the same
•Minor and major upgrade is available if any of the following is true:
oProductCodes of old and new package are not the same
oProductVersions of the old and new package are not the same
Depending on the selection here, RayPack may adjust the ProductCode and UpgradeCode accordingly to make sure that the currently edited project meets the Windows Installer criteria of being major, minor or small upgrade.
Step 4: Synchronization
This page is only visible if the “I have the package for the previous version of this application” has been selected on the first screen.
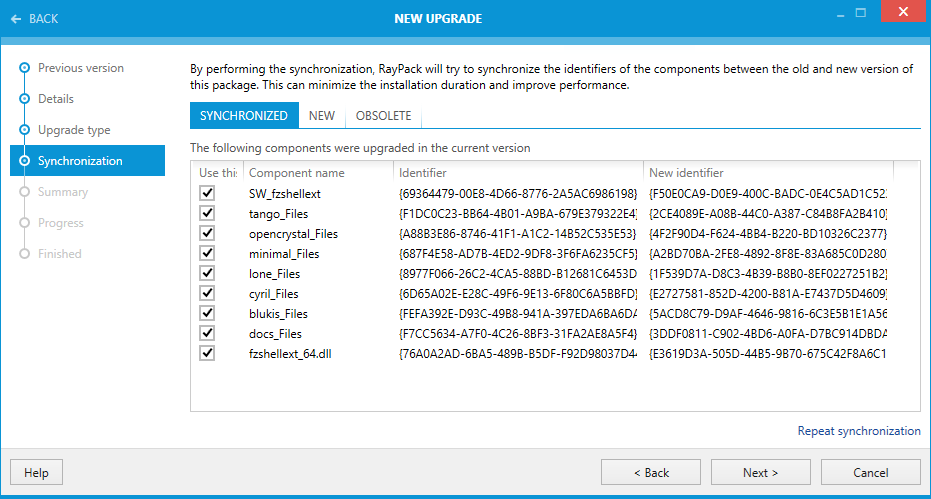
This page allows performing optional synchronization process. The synchronization reads the data from the new and old MSI package and determines which components are unchanged (the same) in both packages.
Two components are considered the same if (all must be true):
•They have the same resources (files, registries, shortcuts, etc.)
•The versions of files (if applicable) are the same
•The installation folders are the same
If any pair of such components is found, RayPack will try to synchronize the GUIDs of the component by updating the GUID of the component in the current package. By doing so the process of upgrade will be more smooth and reliable, because components having the same content will be also considered the same by the upgrade mechanism (which distinguish components by their GUIDs).
To start the synchronization, click the SYNCHRONIZE NOW button.

There are three tabs:
•SYNCHRONIZED: These components were evaluated and found to be the same in old and new package. The Identifier column shows the current GUID of the component, the New identifier column shows the GUID to which the component will be renamed.
|
Be aware: If two same components were found but their identifiers are already the same, they will be not displayed in the SYNCHRONIZED tab. |
By ticking and unticking the checkboxes you can also control which changes will be actually applied to the current project.
•NEW: These components are present in the new package but absent in the old one. Also components that were changed are listed here.
•OLD: These component are present in the old package but absent in the new one. Also component that were changes are listed here.
Step 5: Summary
Use the summary page to check the correctness of the upgrade properties that were defined during the previous wizard steps.
•If all properties are set as required, click PROCESS to finally create the shortcut
•If changes are due, click BACK until the wizard step with the incorrect property definition(s) is displayed and make modifications as required.
Please note that changes in an early step may lead to different defaults or options in any later step. Therefore, please verify that all steps contain the desired settings whilst NEXTing to the summary page again.
Step 6: Progress
The upgrade information will be processed and applied to the current packaging project.
Step 7: Finished
Once the new upgrade has been created, the wizard can be closed by using the FINISH button at its lower right corner. The UPGRADES view is updated, and the list of existing upgrades contains the newly created entry.