|
Be aware: The RayVentory Inventory Agent for Windows needs the Windows Task Scheduler 2.0 (Windows Vista/Server 2008 and newer)! |
Serverside Configuration
Upload and Download
AD Domain users are always able to download files and upload inventory data. If necessary, RayVentory Scan Engine also support Basic authentication. In order to change the credentials for uploads and downloads after the installation it is necessary to change the configuration of the agent. In order to do this, it might be necessary to deploy the software again.
Add the Windows Account to RayVentory Scan Engine
Execute the following steps in order to activate Basic authentication and to add the necessary Windows User credentials.
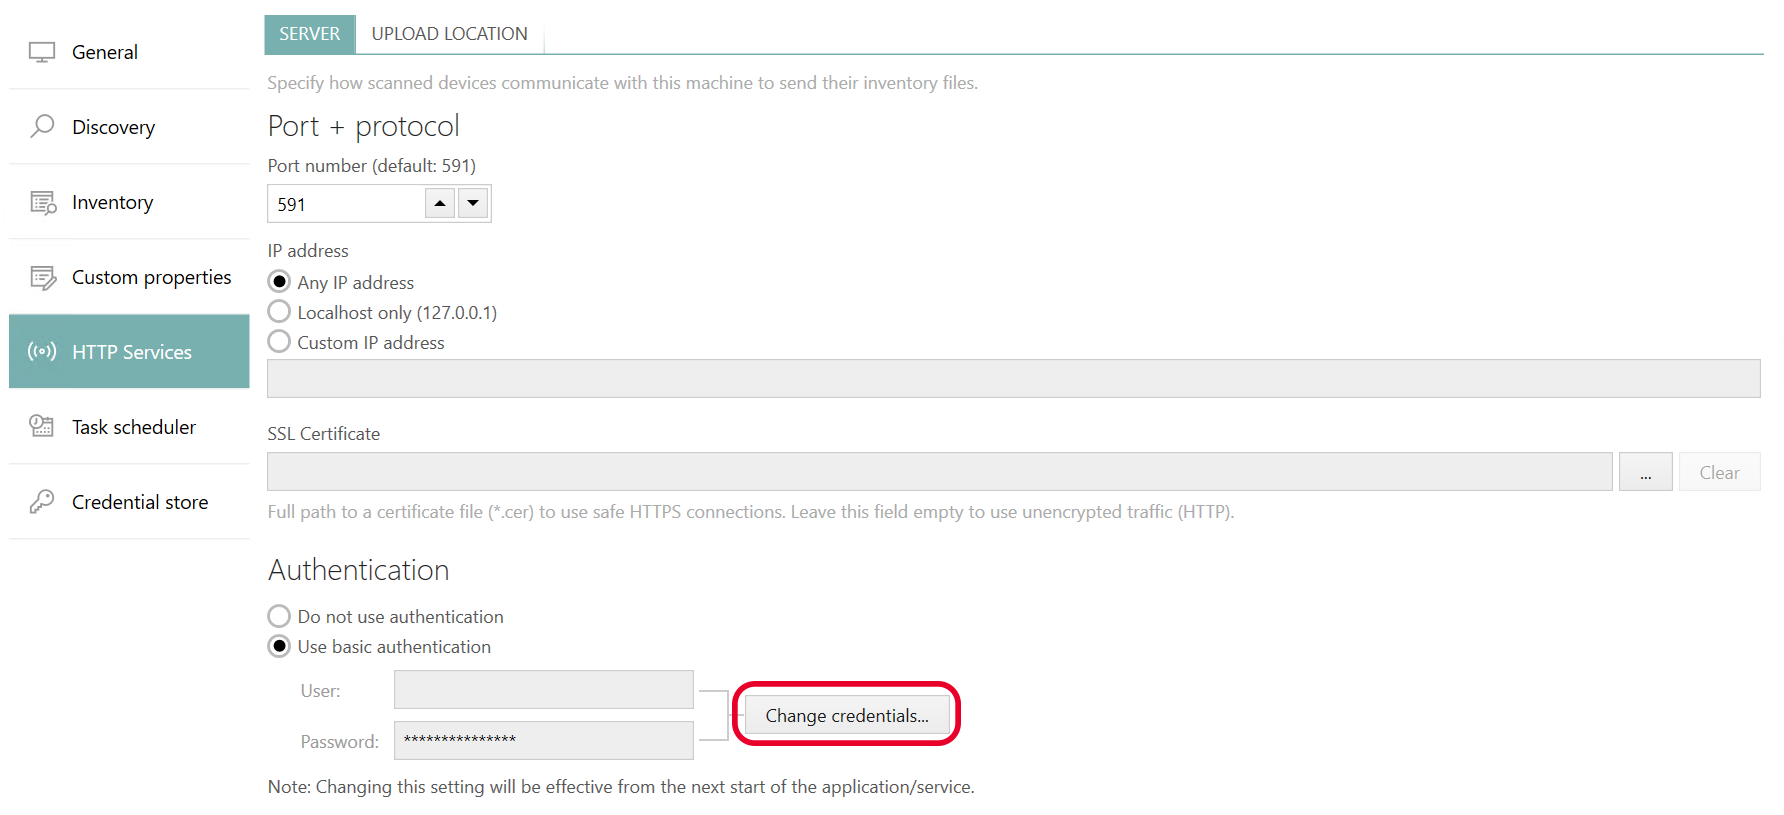
In the HTTP Services tab in the Settings activate the Use basic authentication option by selecting the radio button. Two new fields (User and Password) and the Change credentials... button will now be available in the tab.

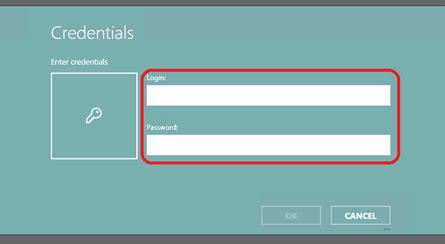
Click on the Change credentials... button. The Credentials dialog will be opened.

Enter the user into the Login field of the dialog and the password into the Password field of the dialog and click on the OK button.
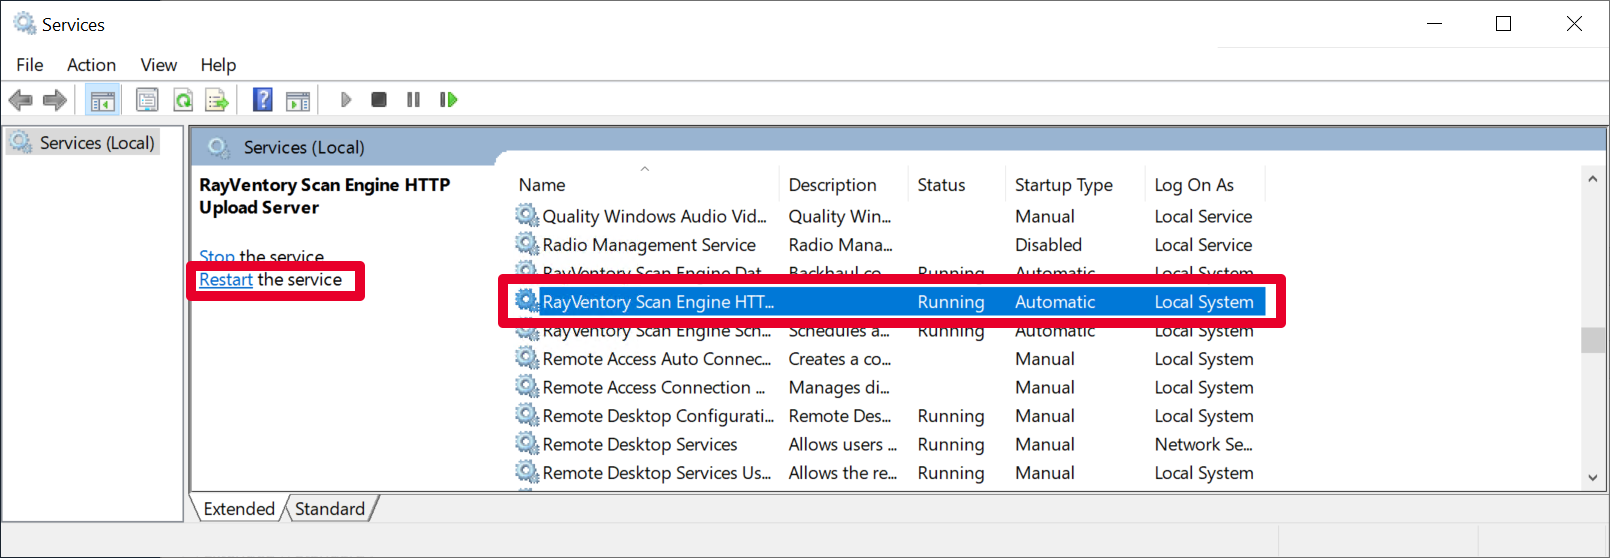
After the credentials have been added or changed, it is necessary to restart the RayVentory Scan Engine Scan Engine HTTP Upload Server service.

After the restart of the server the new settings will be applied.
Windows User Setup
The user has to be part of a local user group which has by default read access to the C:\ProgramData\Raynet\RayVentoryPortal\Results\rviaconfig folder. This folder contains all configuration files for the agent.
|
Note: The path to the folder may differ from the one given here. In order to find the path for the specific installation start the RayVentory Scan Engine and go to Settings > Inventory > Inventory Agent. |
For the upload, the user needs writing permissions for the following folder:
C:\ProgramData\Raynet\RayVentoryPortal\Results\RemoteExecution
|
Note: Directly after the first installation of the RayVentory Scan Engine the RemoteExecution folder is missing. It will be created with the first upload of an agent. It is also possible to create it manually and then grant writing permissions to the user, by either adding the user to the local users group or by explicitly granting writing permissions to this user. |
Configuration of the Windows Agent
It is possible to create multiple configurations before starting a rollout of the Windows agent. It is recommended to create one configuration file for clients and one configuration file for server.
 |
Best Practice: It is recommended to create one configuration file for Windows clients and one configuration file for Windows server. |
Example:
Configuration file name |
Recommended for |
Scope |
|---|---|---|
ClientStandard.cfg |
Windows 7 - Windows 10 |
Default inventory executed after the Windows logon and at specific times. |
ServerStandard.cfg |
Windows Server 2012 R - Windows Server 2019 |
Inventory during the start of the system and at specific times. It should contain all the default plugins for the extended software inventory (for example: Microsoft Exchange, Microsoft Sharepoint, IIS, and other products). |
By default, the configuration files can be found in the following folder on the server where RayVentory Scan Engine is installed:
C:\ProgramData\Raynet\RayVentoryPortal\Results\rviaconfig
Experienced users can edit the .cfg files using any text editor. It is important that the changed .cfg file will be saved in the ANSI format. A description of the different parameter that can be used in the file can be found in the Parameters chapter.
Installation of the Windows Agent
Custom Installation Variants
The installation is based on the Microsoft Windows Installer and allows for extensive modifications to roll out specific settings or modified files. For example, it allows for the following:
•Changing the content or the scope of the plugins.
•Changing the content of the wmitrack.ini.
•Expanding the settings of the whitelisted.xml.
Installation of the Windows Agent
Source Folder
After installing RayVentory Scan Engine for the first time or after updating it, the latest setup for the agent can be found in the %Program Files (x86)%\RayVentoryScanEngine\Contrib\InventoryAgent\Windows folder.
The RayVentory _Inventory_Agent.msi can be copied from there and either be integrated into the software deployment tool or made available for download on a network share.
Installation with Custom Configuration
It is important to add the correct configuration file when installing. The configuration file can be added by using a parameter which defines the URL used for the download and the user that has been added to RayVentory Scan Engine.
Sample call for an unattended installation:
msiexec /i "%~dp0RayVentory_Inventory_Agent.msi" /qn /L*v "%temp%\RayVentorySetup.log"
CONFIGDOWNLOADSOURCE=https://RVSE:8099/rviaconfig/ClientStandard.cfg
CONFIGDOWNLOADUSER=Agent_UploadUser CONFIGDOWNLOADPASSWORD=XYZ
CONFIGDOWNLOADSOURCE needs to contain the complete URL of the download path for the .cfg that is being used. CONFIGDOWNLOADUSER needs to contain the user and CONFIGDOWNLOADPASSWORD contains the password of the selected user.
Preparing the Agent Setup for the Deployment by a Software Deployment Tool
In order to use a software deployment tool, it is necessary to create a custom setup. The following steps describe how to create a custom package and how to integrate an SSL certificate in order to simplify the deployment.
1.Create a folder for the creation of the custom setup (for example: D:\Source\RV-Agent).
2.Execute the following command-line:
msiexec /a "C:\Program Files (x86)\RayVentoryScanEngine\Contrib\InventoryAgent\Windows\RayVentory_Inventory_Agent.msi
Chose the newly created folder (D:\Source\RV-Agent) as target folder.
3.Copy the extracted agent setup to a network share or a public share.
4.Modify the template.cfg file in the D:\Source\RV-Agent\ProgramFiles\RayVentory\InventoryAgent folder as needed.
5.Delete the # from a parameter to activate it. Add # in front of a parameter to deactivate it.
Example:
These changes are used to define the configuration that will be used.
Change #configDownloadSource= to configDownloadSource=https://RVSE:8099/rviaconfig/ClientStandard.cfg.
Change #resultUploadDestination= to resultUploadDestination=http(s)://RVSE:8099/
Important: The upload URL needs to end with "/"
Example:
This change is used to define that usage metering will be disabled.
Change #usageDisabled= to usageDisabled=true.
Important: true will deactivate this option, false is used in order to activate it.
6.Save the template.cfg.
7.Modify the curl-ca-bundle.crt as described in https://raynetgmbh.zendesk.com/hc/en-us/articles/4408460779796.
For a direct installation using the preconfiguration execute the D:\Source\RV-Agent\RayVentory_Inventory_Agent.msi. During the installation the files in the ProgramFiles folder will be used for the installation and need to be taken into consideration for the deployment. The parameters CONFIGDOWNLOADSOURCE, CONFIGDOWNLOADUSER, and CONFIGDOWNLOADPASSWORD are no longer needed.
Manual Upload of Inventory Data
In case a client is offline (for example if the client has no LAN or internet access) it is possible to copy an .ndi file created by NDTrack and upload it to RayVentory Scan Engine using one of the following methods:
Using Powershell (Windows only):
Invoke-RestMethod -Uri 'https://RVSE:8099/filename.ndi' -Method Put -InFile '.\filename.ndi' -UseDefaultCredentials
Using CURL (available for Linux/Unix or the latest Windows 10 and Windows Server 2019 versions):
Curl -T filename.ndi https://RVSE:8099/
All of the above examples use the current user context. If another user should be used for the upload additional parameter will be needed depending on the command.
All inventories that have been uploaded either manually or by the agent can be found in the file system of the RVSE server in the C:\ProgramData\Raynet\RayVentoryPortal\Results\RemoteExecution folder.
|
Be aware: Device information and inventory data will only be shown in the Devices view of RayVentory Scan Engine if the web upload has been used. |
|
Note: It is possible to simply copy a file into the folder and it will also be forwarded to the RayVentory Server (using the Upload action in RayVentory Scan Engine), but it will not be shown in the devices view. |
Uninstallation of the ManageSoft Agent
Manual Uninstallation
The Managed Device Agent that has been used by RayVentory previous to version 12.2 cannot be updated automatically by the RayVentory Agent setup of version 12.2 and afterward since some fundamental functions have been changed. Therefore the ManageSoft Agent has to be uninstalled manually by executing the following steps:
1.Uninstall the package Default Configuration Schedule for Managed Devices.
oFurthermore all packages where (via RayManageSoft) is part of the name need to be uninstalled.

2.Uninstall all ManageSoft Agents if the version is lower than 12.2.
oA restart might be necessary.

3.All previous registry entries for RayManageSoft need to be deleted since they might lead to unpredictable problems when using the RVIA agent.
oHKLM\SOFTWARE\WOW6432Node\ManageSoft Corp (64-Bit)
oHKLM\SOFTWARE\ManageSoft Corp (32-Bit)
|
WARNING On the RayVentory Server these entries must be kept! They contain critical information about the functionality of the RayVentory Server and without them, the server might no longer be fully functional. |
4.Clean the device of all installation files that might still be on the system.
oDelete the installation folder (by default: %ProgramFiles(x86)%\ManageSoft).
Automated Uninstallation
The individual packages of the ManageSoft agent can be uninstalled using the command-line. For this, administrative rights are needed.
1.The Client Machine Schedule package and the Machine Schedule package can be uninstalled using ndlaunch. The schedule depends on the devices being a client or a server.
oUse the following command to uninstall the old configuration package:
"%ProgramFiles(x86)\ManageSoft\Launcher\ndlaunch" -o InstallProfile -d "Default Client Machine Schedule"
|
Be aware: The correct installation folder for RayManageSoft needs to be used. |
oUse the following command to uninstall the other old configuration package:
"%ProgramFiles(x86)\ManageSoft\Launcher\ndlaunch" -o InstallProfile -d "Default Machine Schedule"
|
Be aware: The correct installation folder for RayManageSoft needs to be used. |
2.The uninstallation of the Managed Device agent depends on the installed version.
o10.51: MsiExec.exe /qn /X{1160EA41-AC3A-4B41-9BA6-1E0210ABBA96}
o11.00: MsiExec.exe /qn /X{500B0922-7A7C-4EDC-8797-46F4DCCC75F5}
3.The registry entries can be deleted using Powershell:
oRemove-Item -Path 'HKLM:\SOFTWARE\WOW6432Node\ManageSoft Corp\' -Force
oRemove-Item -Path 'HKLM:\SOFTWARE\ManageSoft Corp\' -Force
|
WARNING On the RayVentory Server these entries must be kept! They contain critical information about the functionality of the RayVentory Server and without them, the server might no longer be fully functional. |
Troubleshooting
The Client or the Windows Agent Does Not Connect to RayVentory Scan Engine
Check the Availability of the RayVentory Scan Engine URL
1.On the client (Windows) open a web browser.
2.Enter the URL for the server where RayVentory Scan Engine is installed (for example: https://RVSE:8099/) and open it.
3.If the connection is successful, the screen will show OK.
If the URL cannot be reached
a)Check if the URL is still correct. Also try using https instead of http if an SSL certificate is now in use.
4.Check if the name is resolved correctly by the DNS resolver by using the nslookup command (for this example: nslookup RVSE. The IP address for RVSE must be known and given as output. If this is not the case, the Windows administrator needs to check if the correct DNS server has been configured for the device and the network administrator should create a new DNS entry.
|
Note: In case there is a DNS problem, the URL can also be called using the IP address. This could be useful for the troubleshooting but is not recommended for regular usage. An IP address can be changed at any time and this could lead to further problems, for example if an SSL certificate is used. These are normally issued for a server name / FQDN (due to security reasons) and not for a specific IP address. |
b)Check that the port 443 is not blocked by a firewall by using the following command:
tnc {computer}.{domain} -Port 443
The result must be:
TcpTestSucceeded : True
If the result is False, check that the RayVentory Scan Engine settings and the local firewall rules are set for the port 443, before contacting a network administrator.
The Agent Does Not Update the Configuration File
1.Check the path that has been configured in the rvia.cfg that can be found on the device in the %ProgramData%\Raynet\RayVentoryInventoryAgent folder.
The parameter is configDownloadSource and an example path would be https://RVSE:8099/rviaconfig/ClientStandard.cfg.
2.Check if it is possible to reach the URL. In order to do this, open a web browser and call the URL. If the path is incorrect, the web browser will show an error message.
|
Be aware: This is case sensitive, therefore It is important that all upper and lower cases are correct. |
3.If the path exist, the web browser will ask for a username and a password. These should be the same as those configured in RayVentory Scan Engine in the Basic Authentication.
4.The content of the .cfg should be shown directly or after a successful authentication.
5.If there is an error in the path, the parameter configDownloadSource in the rvia.cfg file needs to be changed. After the change, the GetConfig task should be restarted in the Windows Task Scheduler and the result should be checked.
MSI Parameter
SP1 |
SP2-4 |
|
|---|---|---|
MSI Parameter |
configDownloadSource logLevel saasDiscoDaysBack usageAgentDisabled |
configDownloadSource logLevel saasDiscoDaysBack usageAgentDisabled |
Find-and-replace parameters for template.cfg |
configDownloadUser configDownloadPassword resultUploadCurlArgs resultUploadMaxDelay logFileSizeLimit oracleUser oraclePass oracleSysDba encryptionKey configDownloadProxyUrl configDownloadCurlArgs configDownloadMaxDelay resultUploadDestination resultDirectory resultUploadUser resultUploadPassword resultUploadProxyUrl |
configDownloadUser configDownloadPassword logFileSizeLimit encryptionKey configDownloadProxyUrl configDownloadCurlArgs configDownloadMaxDelay |