Preparing the Installation
RayFlow PowerShell API installation resources come along as an MSI file. Usually, the setup files are delivered via FTP server as provided by our support which can be contacted via our Support Panel.
In order to install and use the Product, the following prerequisites are required:
•RayFlow Server 5.0 or newer
oRayFlow PowerShell API has an experimental support for older instances.
•PowerShell 3.0 or higher
Licensing
RayFlow PowerShell API does not require any specific license. The only requirement is that the server you are targeting has a valid license for RayFlow.
Installing RayFlow PowerShell API
Launch the RayFlow PowerShell API setup with a double-click on the MSI file and wait for the Welcome Screen to be prepared.
|
Note: Install RayFlow PowerShell API on a machine which will be used to automate the task. The API can connect to a remote instance of RayFlow, and as such there is no need to install RayFlow PowerShell API directly on the server (unless you want to automate tasks with PowerShell API by running the automation module on that very server). |
During the installation, the following screen will be shown:
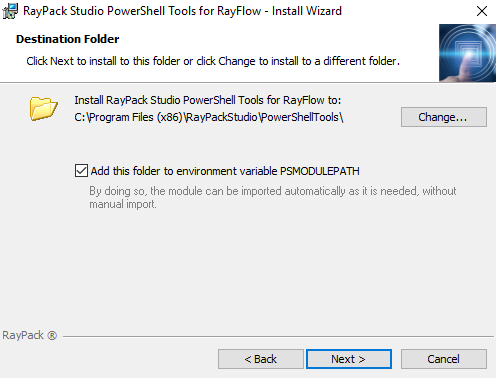
It is recommended to select the checkbox Add this folder to enviornment variable PSMODULEPATH, which will simplify execution of the scripts later on. Once RayFlow PowerShell API modules are registered there, the user does not have to know where to import the module as PowerShell imports required modules automatically.
The default installation directory C:\Program Files (x86)\RayPackStudio\PowerShellTools is compatible with the default folder structure set up when installing RayPack Studio components. You can change this folder to any directory you like.